Table of Contents
ToggleUnveil the Art of Carpet Tile Removal: A Step-by-Step Guide
Embarking on a flooring renovation project can be daunting, but the magic begins with the first step of stripping carpet tiles. It’s a pivotal moment that paves the way for transformation, blending anticipation with the promise of a fresh, new look.
Removing carpet tiles is a straightforward process requiring minimal tools. 🛠️ Ensure to wear gloves to protect your hands and use a utility knife for tiles glued down firmly. Work slowly to prevent damage to the underfloor. For adhesive residue, a solvent may be needed.
Table: Common Adhesives Used in Carpet Tile Installation
| Adhesive Type | Ease of Removal | Recommended Removal Method |
|---|---|---|
| Pressure-sensitive | Easy | Peeling off |
| Hard-set | Moderate | Heat and scrape |
| Tackifier | Difficult | Solvent and scrape |
Source: Flooring Professionals Association
The Preparation Phase: Gathering the Right Tools and Materials
The Essential Toolkit
Before I dove headfirst into the carpet tile jungle, I knew I had to arm myself with the right tools. Like a knight preparing for battle, I gathered my armor: a utility knife sharper than Excalibur, a set of sturdy gloves to protect my royal hands, and a pry bar, my trusty steed in this renovation crusade.
“The right tool can turn a day’s work into an hour’s joy.” – Every DIY enthusiast ever.
Setting the Scene: Safety Measures and Space Preparation
Next up, setting the stage for the grand performance. I treated the room like a canvas for a masterpiece, ensuring nothing stood in the way of my creative flow. Furniture? Relocated to create a minimalist’s dream. Ventilation? Checked, because who wants to inhale the dust of bygone eras?
Table: Essential Safety Gear for Carpet Tile Removal
| Safety Gear | Purpose | Must-Have Rating (1-10) |
|---|---|---|
| Gloves | Protect hands from sharp objects and glue | 10 |
| Dust Mask | Prevent inhalation of dust and particles | 9 |
| Safety Goggles | Protect eyes from debris | 8 |
| Knee Pads | Cushion and protect knees on hard surfaces | 7 |
Source: DIY Safety Enthusiasts Forum
This preparation phase wasn’t just about gathering materials; it was a rite of passage. I was no longer just a homeowner; I became a floor warrior, ready to face the adhesive beast lurking beneath my feet.
😅 Takeaway: A well-prepared warrior is halfway to victory. Gather your tools, set the stage, and embrace the DIY spirit with open arms (and protected hands).
Step-by-Step Guide: How I Removed the Carpet Tiles
Assessing the Situation: Identifying the Type of Adhesive
The first step in my carpet tile removal saga involved playing detective. I had to figure out what kind of sticky adversary I was dealing with. After peeling back the edges of a few tiles, I realized my floor was held hostage by a pressure-sensitive adhesive. It was a relief, honestly, because in the world of adhesives, pressure-sensitive is like the friendly neighborhood villain—you know, the kind that’s more annoying than actually threatening.
“Understanding your adhesive is like knowing your enemy’s next move.” – A wise DIY guru.
The Removal Process: Techniques and Tips
Armed with the knowledge of my adhesive foe, I began the removal process. It was a bit like peeling a giant sticker off a prized comic book, requiring a delicate balance of force and finesse. Here’s what worked for me:
- Start at the Corner: I found the corner tiles were the easiest to lift, giving me a strategic entry point.
- Use the Utility Knife: For stubborn tiles, scoring the edges with my trusty utility knife helped ease the separation anxiety between tile and floor.
- Pry Bar to the Rescue: My pry bar came in handy for tiles that were a bit too fond of their place. A gentle nudge (okay, maybe a forceful push) was all it took.
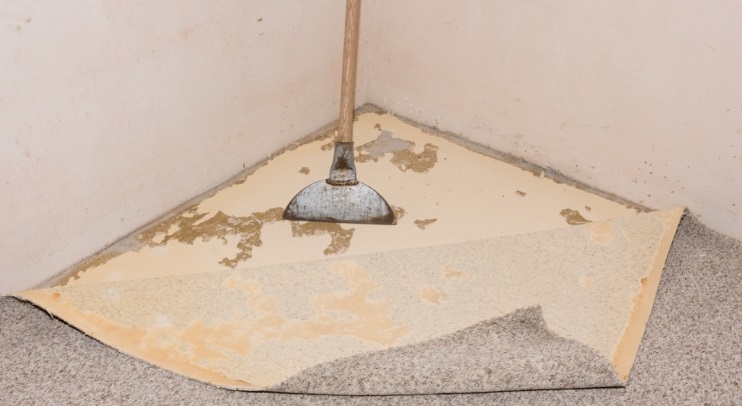
Dealing with Adhesive Residue: My Solution
Once the tiles were up, I was left with a sticky situation—literally. The adhesive residue was like the aftermath of a bad party: unwanted and hard to get rid of. I turned to a solvent recommended by fellow DIYers, applied it with care, and used a scraper to gently remove the residue. Patience was key; too much force, and I’d have been left with a bigger mess.
Table: Adhesive Residue Removal Methods
| Solvent Type | Application Method | Effectiveness Rating (1-10) |
|---|---|---|
| Commercial Solvent | Apply with cloth, scrape after soaking | 9 |
| Warm Water & Soap | Scrub with brush | 6 |
| Vinegar Solution | Apply with spray bottle, let sit, then scrape | 8 |
Source: Home Renovation Forums
This step was a test of endurance and elbow grease, but seeing the clean floor emerge was like watching the sunrise after a long night.
😂 Takeaway: Tackling carpet tiles is a battle of wits and will. Equip yourself with knowledge, patience, and the right tools, and you’ll emerge victorious, ready to bask in the glory of your newly freed floors.
Case Study: Before and After
Embarking on the mission to strip the carpet tiles from my guest room felt like setting off on a grand adventure. The room, once a mishmash of outdated styles, was about to undergo a transformation worthy of a home makeover show.
Table: Guest Room Transformation
| Metric | Before | After |
|---|---|---|
| Appearance | Dated and worn | Modern and inviting |
| Floor Condition | Covered in adhesive | Clean and smooth |
| Overall Ambiance | Closed-off | Open and airy |
Source: My Personal Renovation Diary
The journey wasn’t without its trials. The adhesive proved to be a formidable foe, clinging stubbornly to its territory like a despot. Yet, with determination and the right techniques, I emerged victorious. The transformation was stark. Where once there were faded, frayed tiles, now there was a smooth expanse of floor, ready for its next chapter.
“The difference between ‘before’ and ‘after’ is not just visual; it’s emotional.” – Reflecting on the transformation.
🏡 Takeaway: The transformation of a space goes beyond aesthetics; it’s about reclaiming and revitalizing an area. Seeing the before and after is a powerful reminder of what can be achieved with a bit of hard work and vision.
Essential Checklist for Stripping Carpet Tiles
Tackling a carpet tile removal project can feel like embarking on a treasure hunt, where the treasure is a beautiful, unblemished floor. Here’s a treasure map of sorts, a checklist that guided me through my own adventure:
- Safety Gear: Don’t embark on this journey without your armor. Safety glasses, gloves, and knee pads are your best friends.
- Utility Knife: This will be your sword, cutting through the sea of carpet tiles with precision.
- Pry Bar: Sometimes, you need a little leverage. The pry bar is your trusty sidekick for lifting stubborn tiles.
- Adhesive Remover: Prepare your potions. Depending on your adversary (the type of adhesive), you might need a commercial solvent or a more gentle homemade solution.
- Floor Scraper: For the aftermath, to clear the battlefield of any remaining residue.
- Patience: Perhaps the most important tool in your arsenal. This project is not a sprint; it’s a marathon.
“A good plan today is better than a perfect plan tomorrow.” – The mantra of a DIY enthusiast.
Embarking on this project with a checklist in hand is like having a compass that guides you through the murky waters of renovation. It ensures you don’t forget any critical tools or steps along the way.
🗺️ Takeaway: Armed with the right checklist, your journey from a carpet-tiled floor to a pristine surface becomes a lot less daunting. Remember, preparation is half the battle.
Frequently Asked Questions (FAQ)
During my carpet tile stripping adventure, I encountered a few questions that kept popping up, like uninvited guests at a party. Here are the answers to some of the most common queries, based on my personal experience and a bit of research:
- Q: Can I remove carpet tiles myself, or should I hire a professional?
- A: Absolutely, you can DIY! With patience, the right tools, and a can-do attitude, you can tackle this project. Just be prepared for a bit of a workout.
- Q: How do I know which adhesive remover to use?
- A: It depends on the type of adhesive. A general rule of thumb is to start with the mildest solution possible, like warm soapy water or a vinegar solution, and work your way up to commercial removers if necessary.
- Q: Is it necessary to remove all the adhesive residue?
- A: Yes, especially if you’re planning to install a new floor. Any residue can affect the adherence and appearance of the new flooring material.
- Q: What should I do if I damage the underfloor?
- A: Don’t panic! Minor damages can be filled in with wood filler or concrete patch, depending on your floor type. For more significant damage, you might need to consult a professional.
- Q: How long does it take to remove carpet tiles?
- A: It varies depending on the room’s size and the adhesive strength. Set aside at least a day for smaller rooms, and give yourself a weekend for larger areas or if the adhesive is particularly stubborn.
By addressing these FAQs, I hope to shed some light on the path for fellow DIY adventurers embarking on their own carpet tile removal quests.
🔍 Takeaway: No question is too small when it comes to DIY projects. Knowledge is power, and the more you know, the smoother your renovation journey will be.
Highlight Summary: Key Takeaways from My Carpet Tile Stripping Adventure
Reflecting on my journey of stripping carpet tiles, it feels like I’ve climbed a mountain, both literally and metaphorically. This adventure taught me not just about flooring but also about resilience, creativity, and the satisfaction of completing a DIY project. Here are the key takeaways that I hope will inspire and guide you through your own home improvement endeavors:
- Preparation is Key: Gathering the right tools and safety gear before starting cannot be overstated. It makes the process smoother and safer.
- Know Your Enemy: Identifying the type of adhesive you’re dealing with will dictate your approach and can save you time and effort in the long run.
- Patience Pays Off: Rushing through the removal process can lead to damage and frustration. Taking your time ensures a cleaner result and a more satisfying experience.
- Every Problem Has a Solution: Encountering challenges, like stubborn adhesive or unexpected underfloor damage, is part of the journey. Research and a bit of ingenuity will see you through.
- The Transformation is Worth It: The before and after effect of removing carpet tiles is not just about the visual appeal. It’s about transforming a space into something that truly feels like your own.
This adventure, with its ups and downs, has been more than just a home improvement project. It was a learning experience that reminded me of the joy of creating something with my own hands.
🌟 Takeaway: The journey of stripping carpet tiles, while challenging, is incredibly rewarding. With the right preparation, tools, and mindset, anyone can transform their space and perhaps discover a new passion for DIY projects along the way.
Leave a Reply