Table of Contents
ToggleTransform Your Space: A Guide to Replacing Carpet Tiles
Ever looked at your floors and felt the urge for a change? Replacing carpet tiles can be the quick, cost-effective makeover your room needs.
Replacing carpet tiles is a simple DIY project. 🛠 Remove old tiles by gently lifting them off the floor. Clean the surface thoroughly, ensure it’s dry, then place new tiles starting from the center. For best results, use a utility knife for precise cuts around edges or corners.
Table: Cost Comparison of Carpet Tile Replacement vs. Full Carpet Installation
| Service | Average Cost per Square Foot |
|---|---|
| Carpet Tile Replacement | $1 – $2.50 |
| Full Carpet Installation | $3 – $7 |
Source: Home Improvement Retailers Data
The Decision: Why Carpet Tiles?
Deciding to overhaul the flooring in my living space wasn’t taken lightly. After all, it’s not every day you look down and think, “These floors could really use a personality boost.” My journey into the world of carpet tiles began with a simple desire for a change, one that led me down a rabbit hole of home improvement options.
Choosing Carpet Tiles Over Traditional Carpeting
I found myself torn between traditional carpeting and the modern allure of carpet tiles. The debate in my mind was intense, almost as gripping as choosing between chocolate and vanilla ice cream on a hot summer day. After much deliberation, carpet tiles emerged as the clear winner. Their ease of installation and the promise of hassle-free maintenance were too tempting to ignore. Plus, the idea of mixing and matching designs to create a unique look had me hooked.
“Carpet tiles offer unparalleled flexibility and creativity in flooring design,” mused an expert from a well-known interior design magazine, echoing my thoughts.
Table: Pros and Cons of Carpet Tiles vs. Traditional Carpeting
| Feature | Carpet Tiles | Traditional Carpeting |
|---|---|---|
| Installation | Easy, DIY-friendly | Professional required |
| Maintenance | Replace individual tiles | Whole carpet replacement |
| Design Flexibility | High | Low |
| Cost | $$ | $$$ |
Source: Interior Design Insights
The Benefits: What I Discovered
Once I committed to carpet tiles, I discovered a treasure trove of benefits that made me wonder why I hadn’t considered them sooner. Not only could I play interior designer with the varied patterns and colors, but I also found out that:
- Carpet tiles are incredibly forgiving for DIY novices like myself.
- They’re a dream to clean; a spill on one tile doesn’t mean a crisis for the whole floor.
- The eco-friendly options available meant I could upgrade my floors without the guilt of increasing my carbon footprint.
This exploration into the world of carpet tiles was like opening Pandora’s box, but instead of chaos, it was filled with delightful surprises.
🔨 Takeaway: Carpet tiles are a game-changer for those looking to combine style, practicality, and ease of installation in their flooring choices.
The Preparation: Getting Ready for the Change
Embarking on the DIY journey to replace my carpet tiles felt like gearing up for an adventure. It was me against the floor, and I was determined to come out victorious, equipped with the right tools and a solid plan.
Gathering Materials and Tools
The preparation phase was akin to gathering potions and weapons before a big boss fight in a video game. I needed the right arsenal to ensure a smooth installation process. My shopping list included:
- Carpet tiles (obviously!)
- Utility knife with extra blades
- Straight edge or square
- Measuring tape
- Chalk line or marker
- Double-sided carpet tape or adhesive
I discovered that having everything on hand before starting was crucial. It saved me from the dreaded realization mid-project that I was missing something vital.
“Proper preparation prevents poor performance,” quipped a seasoned DIYer, advice that became my mantra throughout the project.
Setting the Stage: Room Preparation
Clearing the room felt like setting the stage for a grand performance. Every piece of furniture became an obstacle to navigate, turning the task into a real-life game of Tetris. Here’s how I prepared the room for the carpet tile installation:
- Moved all furniture out of the room. This turned into an unexpected workout session.
- Removed the old flooring, which was oddly satisfying and a bit dusty.
- Cleaned the subfloor thoroughly, ensuring it was dry and smooth. This step felt like preparing a canvas for a masterpiece.
This phase of the project was a reminder of the importance of starting with a clean slate. It set the foundation (quite literally) for a successful installation.
🧹 Takeaway: Preparation is key to a successful carpet tile installation. A clean, clear space and the right tools can make the difference between a DIY dream and a flooring fiasco.
The Process: Step-by-Step Guide
The actual installation of carpet tiles was where the rubber met the road, or in my case, where the tile met the floor. With my tools lined up and the room prepped, I dove into the heart of the project, feeling a mix of excitement and nerves.
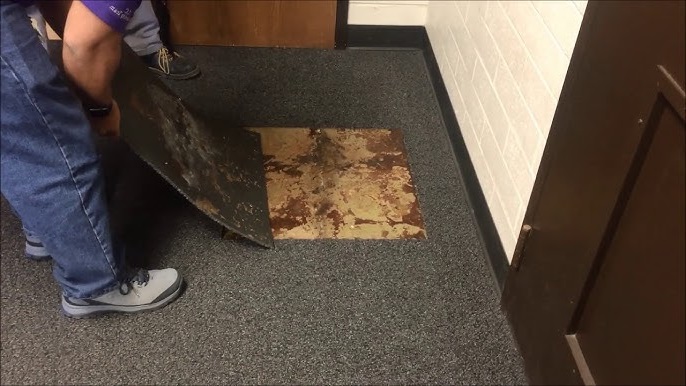
Removing the Old Carpet Tiles
The first step felt like an archaeological dig, peeling back the layers of my home’s history one tile at a time. The process was straightforward but required a gentle hand to avoid damaging the subfloor beneath.
- I started at the corner of the room, using a putty knife to lift the edge of the tile gently.
- Slowly, I worked my way across the room, removing each tile and marveling at the outdated patterns hidden beneath my furniture.
“Removing old tiles is like uncovering the past. You never know what stories you’ll find,” remarked a friend, hinting at the surprises home renovations often reveal.
Cleaning and Preparing the Floor
With the old tiles removed, I had a blank canvas to work with. Ensuring the floor was impeccably clean and even was critical for the smooth installation of the new tiles.
- Sweeping and vacuuming were my first steps, removing any dust and debris from the floor.
- A damp mop followed, picking up any remaining dirt. Watching the floor dry was the only time I wished for superpowers to speed up the process.
Installing the New Carpet Tiles
The installation process was where creativity met precision. Following a clear plan ensured that my vision came to life exactly as I had imagined.
- Starting Point: I marked the center of the room using chalk lines to create a guide for the tile placement. This ensured a symmetrical layout.
- Laying the First Tile: Placing the first tile felt monumental, a small step for my room but a giant leap for my DIY skills.
- Building Out: I worked outwards from the center, pressing each tile firmly into place and making sure the arrows on the back were all pointing in the same direction for a uniform look.
- Cutting Tiles: When it came to edges and corners, my utility knife was my best friend. Measuring and cutting tiles to fit snugly ensured a professional-looking finish.
“The beauty of carpet tiles lies in the simplicity of their installation,” shared an expert in a moment of reflection, a sentiment I found to be true as the pieces of my puzzle came together seamlessly.
📐 Takeaway: The process of installing carpet tiles, from removal to laying the new pieces, is a journey of transformation. With patience, precision, and a bit of creativity, anyone can breathe new life into their space.
The Transformation: Before and After
The completion of the carpet tile installation marked a moment of triumph in my DIY journey. Standing back to admire my work, I couldn’t help but reflect on the transformation that had taken place, not just on the floor, but in the entire ambiance of the room.
Reflecting on the Changes
The change was more profound than I had anticipated. The new carpet tiles brought a warmth and vibrancy that the room had been missing. The satisfaction of stepping on the plush, fresh tiles each morning was a constant reminder of the effort and creativity that went into the project.
- The room felt larger, thanks to the strategic placement and pattern of the tiles.
- Acoustics improved, creating a cozier, more intimate space.
- The ease of maintenance was immediately noticeable; a simple vacuum was all it took to keep the floor looking pristine.
“The transformation goes beyond the aesthetic; it’s about creating a space that reflects your personality and meets your needs,” an interior design expert once said, capturing the essence of my experience.
The Visual Impact: A Photo Journey
Sharing the before and after photos with friends and family, I reveled in their reactions. The visual impact of the transformation was striking:
- Before: The outdated and worn tiles made the space feel dull and uninviting.
- After: Bright, modern tiles breathed new life into the room, making it inviting and vibrant.
The photos served as a tangible record of my journey, from the initial vision to the completed project. They were a testament to the power of change, no matter the scale.
🎨 Takeaway: The transformation of a room through the replacement of carpet tiles is a testament to the power of DIY. It’s not just about changing a floor but about reimagining a space to better suit your style and needs.
Case Study: Living with New Carpet Tiles
Six months after the installation of my new carpet tiles, the decision to overhaul the flooring has proven to be more than just a cosmetic upgrade. It’s been a journey of living with a choice that has affected daily life in surprising and delightful ways.
Durability and Maintenance: A Six-Month Review
Living with carpet tiles has been an enlightening experience. They’ve faced the trials of daily life — from accidental spills to the comings and goings of a busy household — with resilience and grace.
- Durability: The tiles have stood up remarkably well to traffic, showing little sign of wear. Their robustness in the face of pet antics and accidental spills has been a relief.
- Maintenance: Cleaning has been a breeze. The occasional spill can be tackled by simply lifting the affected tile for a more thorough clean or replacing it if necessary. This modular aspect has made maintenance both efficient and cost-effective.
“The true test of any home improvement is how it holds up to the rigors of daily life,” observed a home lifestyle blogger. This insight rings true for my experience with carpet tiles, showcasing their practicality and longevity.
Living with these tiles has underscored their value not just in aesthetic terms but in their contribution to a functional, low-maintenance home environment. The ease of care and the ability to replace individual tiles without upheaval are benefits that have cemented my satisfaction with the decision to install them.
🏠 Takeaway: Carpet tiles offer a blend of durability and ease of maintenance that makes them an ideal choice for modern living. Their performance over time underscores their practicality, making them a wise investment for any homeowner looking to combine style with functionality.
The DIY Checklist: Ensuring Success
Embarking on a DIY carpet tile installation project filled me with a sense of adventure, akin to preparing for a culinary experiment without a recipe. But to ensure the dish turned out delicious rather than disastrous, a checklist was indispensable. This list became my guide, ensuring I didn’t miss a step or ingredient in the process of transforming my floors.
- Measure your space accurately to determine how many tiles you’ll need, adding a little extra for mistakes or future replacements.
- Choose the right tiles for your space, considering factors like foot traffic, color, and texture.
- Gather your tools: utility knife, straight edge, measuring tape, chalk line or marker, and adhesive.
- Prepare the subfloor by cleaning it thoroughly and ensuring it’s dry and level.
- Plan your layout by starting from the center of the room and working your way outwards, adjusting as necessary for a balanced look.
- Cut tiles as needed with precision, using a straight edge to guide your utility knife for clean, straight cuts.
- Adhere tiles securely to the subfloor, following the manufacturer’s instructions for adhesive application.
- Roll over the surface after installation to ensure firm adhesion and eliminate air pockets.
“A good plan is like a roadmap; it shows the final destination and usually the best way to get there,” mused a DIY guru, capturing the essence of my checklist approach.
📝 Takeaway: A well-prepared checklist is the secret sauce to a successful DIY carpet tile installation. It ensures that every step is planned and executed with precision, turning the daunting task of floor transformation into a manageable and even enjoyable project.
FAQ: Answering Your Questions
Diving into a DIY project, especially one as impactful as replacing carpet tiles, often raises a flurry of questions. Armed with my experience and a bit of research, I aim to shed light on some of the most common inquiries.
- Can I install carpet tiles over an existing floor? Yes, carpet tiles can be installed over various types of flooring, provided the surface is clean, dry, and smooth. However, it’s important to remove any old carpeting to ensure the best adherence and longevity of your new tiles.
- How do I clean and maintain my carpet tiles? Regular vacuuming will keep your carpet tiles looking fresh. For spills, you can lift and clean or replace individual tiles, which is a game-changer for maintenance. Always follow the manufacturer’s recommendations for deep cleaning.
- Do I need professional help to install carpet tiles? While you can hire professionals, carpet tiles are designed for easy DIY installation. With the right tools and a bit of patience, anyone can lay carpet tiles and achieve professional-looking results.
- How do I decide on the pattern or direction of the tiles? This depends on your aesthetic preference. Some prefer a uniform look with all tiles facing the same direction, while others might opt for a checkerboard or random pattern. Consider the room’s size and natural light when deciding, as this can impact the overall look.
- Are carpet tiles eco-friendly? Many carpet tiles are made from recycled materials and can be recycled after their life cycle, making them a more sustainable option than traditional carpeting. Look for products with environmental certifications to ensure you’re making an eco-friendly choice.
“Questions are the root of all answers. Don’t be afraid to ask,” a wise person once said, encouraging the curiosity that leads to better-informed decisions and more successful projects.
🔍 Takeaway: Asking and answering questions is a crucial part of any DIY project, especially when it comes to installing carpet tiles. Being informed not only helps in making better decisions but also ensures a smoother process and more satisfying results.
Highlight Summary: Key Takeaways from My Journey
Reflecting on the rollercoaster ride that was my carpet tile replacement project, a few key takeaways stand out. These insights not only paved the way for a successful installation but also enriched my DIY experience, offering lessons that extended beyond the realm of home improvement.
- Planning and Preparation Are Paramount: Just like in cooking, the best outcomes in DIY projects come from thorough preparation and having a clear recipe—or plan—in mind. Measuring the room accurately and having all the tools and materials ready before starting can save a lot of headaches down the line.
- Flexibility and Creativity Go Hand in Hand: One of the joys of working with carpet tiles is the creative freedom they offer. Whether it’s playing around with patterns or adjusting the layout on the fly, the process reminded me to embrace flexibility and creativity in equal measure.
- The Devil Is in the Details: Paying attention to the small things, like ensuring tiles are laid out in the right direction and edges are cut cleanly, can make a big difference in the finished look. It’s the meticulous attention to detail that elevates a DIY project from good to great.
- DIY Can Be a Rewarding Learning Experience: Beyond the satisfaction of seeing the transformed space, the project was a valuable learning experience. From honing my problem-solving skills to understanding the importance of patience and persistence, the journey was as rewarding as the outcome.
“Every project is a lesson in disguise, teaching us not just about the task at hand but about ourselves,” I was reminded throughout this endeavor. This sentiment perfectly encapsulates the essence of DIY projects, where the journey is just as important as the destination.
🛠 Takeaway: My journey through replacing carpet tiles has been a testament to the value of preparation, creativity, attention to detail, and the inherent learning experiences within DIY endeavors. These insights not only ensure a successful project but also enrich the DIY journey, making it a deeply fulfilling experience.
Leave a Reply