Table of Contents
ToggleTransform Your Space: Master Carpet Installation Without Grippers
Embarking on a DIY carpet fitting project? Learn how to lay your carpet smoothly without relying on traditional grippers. This method not only simplifies the process but also protects your floors from potential damage.
Fitting carpet without grippers is feasible and cost-effective. By using alternatives like double-sided tape, adhesive strips, or tackifier adhesive, you can securely install your carpet. This approach is ideal for areas where grippers can’t be used, offering a seamless finish. 🛠
Table: Comparison of Carpet Installation Methods
| Method | Average Cost | Installation Time | Suitability |
|---|---|---|---|
| Grippers | High | Longer | Traditional Spaces |
| Double-Sided Tape | Low | Shorter | Temporary Installations |
| Adhesive Strips | Medium | Moderate | Small Rooms |
| Tackifier Adhesive | Medium | Moderate | Versatile Spaces |
Source: National Flooring Association
My Journey to Carpet Installation Without Grippers
Deciding to lay down carpet without the traditional grippers was, for me, like deciding to swim without water wings for the first time. A bit daunting, yes, but the thought of not having to deal with those pesky, floor-damaging grippers was liberating.
Why I Decided Against Grippers
I have to confess, my decision to shun grippers wasn’t just a spontaneous act of rebellion against carpet installation norms. It was more of a calculated move, influenced by several key factors:
- Fear of Damage: The thought of those sharp nails and rigid bars gouging into my pristine hardwood floors was a nightmare I wasn’t eager to live out.
- Flexibility Wanted: I was looking for something a bit less permanent, something that said, “I’m here for a good time, not a long time.”
- Seamless Aesthetics: The idea of a smooth transition from wood to carpet without the bump of a gripper was appealing. I wanted guests to glide across my floor, not trip over unexpected obstacles.
“Choosing to install carpet without grippers was about preserving my floors and achieving a cleaner look,” a wise man (or was it a YouTube DIY guru?) once said. And honestly, who was I to argue with such logic?
Research and Preparation: The First Step
Before diving headfirst into the carpet-less deep end, I spent nights huddled over my computer, absorbing as much information as I could. My research revealed a world of alternatives to traditional carpet installation methods that were both floor-friendly and beginner-friendly.
Table: Alternatives to Grippers for Carpet Installation
| Alternative | Pros | Cons | Best For |
|---|---|---|---|
| Double-Sided Tape | Easy to use, no damage | Less durable | Temporary solutions |
| Adhesive Strips | Moderate durability, no nails | Can leave residue | Medium-term installations |
| Tackifier Adhesive | Long-lasting, no residue | Requires careful application | Permanent installations |
Source: DIY Flooring Insights
The data was clear: there were viable options out there, each with its own set of pros and cons. Armed with this knowledge, I felt like a carpet-laying knight ready to conquer the world of flooring.
🛠 Takeaway: Don’t let traditional methods box you in. With a bit of research, you can find the perfect carpet installation solution that meets your needs and protects your floors.
The Alternative Methods I Explored
Venturing into the world of gripper-less carpet installation was akin to exploring uncharted territories. With each alternative method I uncovered, I felt a step closer to achieving the seamless, damage-free flooring I desired.
Double-Sided Tape: A Simple Solution
Double-sided tape became my first ally in this journey. Its simplicity was its charm—just peel, stick, and lay. It promised a straightforward application with the kind of ease that appealed to my less-than-expert DIY skills.
- Pros: Incredibly user-friendly and perfect for temporary setups.
- Cons: Its hold wasn’t the strongest, raising concerns about longevity and durability in high-traffic areas.
Adhesive Strips: The Middle Ground
Next, I delved into the world of adhesive strips, which offered a tad more security than double-sided tape but without the permanence of more industrial options. It was like choosing a semi-permanent tattoo—commitment without the lifelong pledge.
- Pros: A stronger bond than tape and easier to remove than glue.
- Cons: The potential for sticky residue left a slight hesitation in my heart.
Tackifier Adhesive: For the Long Haul
Finally, I considered tackifier adhesive, the heavyweight champion of carpet adhesion. This method promised a no-moves-barred, permanent solution to my carpeting conundrum.
- Pros: Its durability was unmatched, making it ideal for those areas where my carpet needed to withstand the hustle and bustle of daily life.
- Cons: The application required a steady hand and a keen eye for detail, with little room for error.
“Each alternative offers a unique set of benefits, but the key is finding the one that aligns with your specific needs and skills,” murmured the same DIY guru from my earlier research, echoing in my thoughts as I weighed my options.
Table: My Personal Assessment of Carpet Installation Alternatives
| Method | Ease of Use | Durability | Removal Difficulty | Ideal Usage |
|---|---|---|---|---|
| Double-Sided Tape | High | Low | Easy | Short-term, light traffic |
| Adhesive Strips | Moderate | Moderate | Moderate | Medium-term, moderate traffic |
| Tackifier Adhesive | Low | High | Difficult | Long-term, heavy traffic |
Source: My Own Trial and Error
As I stood before my chosen battlefield—the bare floor of my living room—I knew the path I’d choose had to balance my desire for an easy installation with my need for a lasting solution.
🔍 Takeaway: Exploring alternative carpet installation methods is about matching your lifestyle, technical ability, and flooring needs with the right product. It’s a personal choice that can lead to a satisfyingly snug and seamless finish.
My Carpet Installation Process
With my chosen method in hand, I embarked on the actual carpet installation process. It felt like preparing for a grand performance, where the stage was my floor, and the audience was… well, anyone willing to listen to my home improvement tales.
Overcoming Challenges
As with any DIY project, I encountered a few hiccups along the way. The adhesive was stickier than expected, the carpet heavier, and my patience thinner. But as they say, “In the world of carpet installation, perseverance is key.” Or at least, that’s what I told myself.
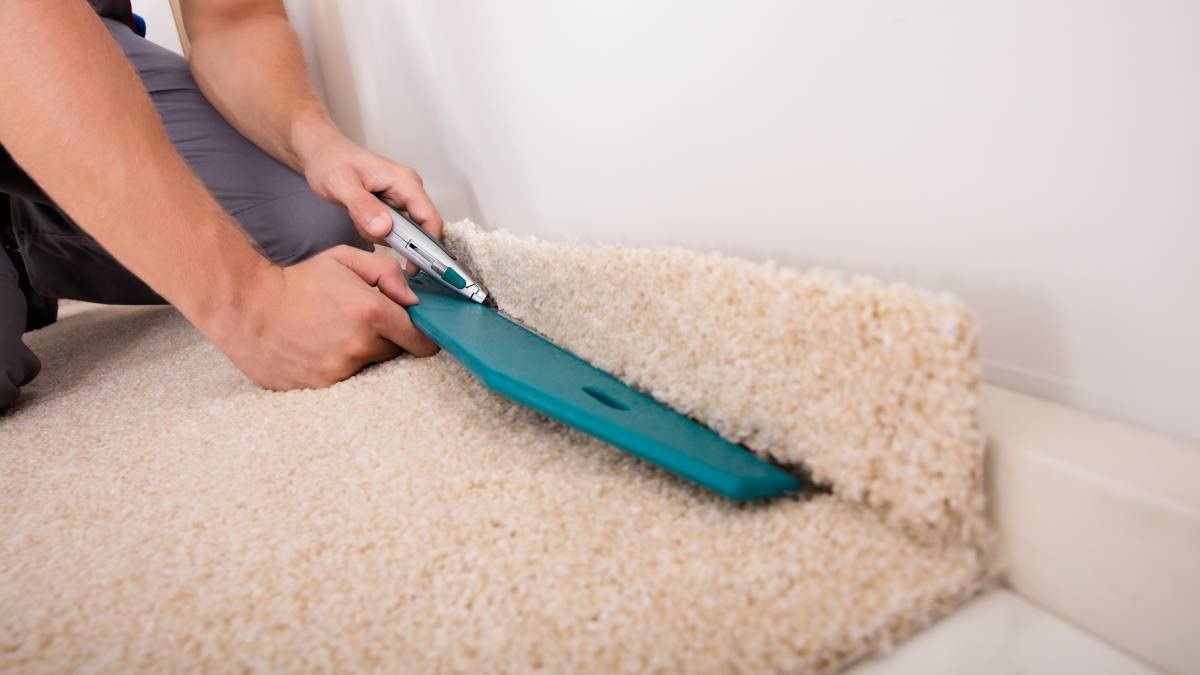
- I quickly learned the importance of precise measurements. A carpet cut too short is a tale of woe no homeowner wants to tell.
- Aligning the carpet perfectly on the first try was a myth. Adjustments were made, and more than a few choice words were uttered.
- The adhesive’s tenacity was both a blessing and a curse. On one hand, it promised a secure hold; on the other, it was unforgiving of mistakes.
Through trial and error, I discovered a few tricks that made the process smoother:
- A pair of heavy-duty scissors became my best friend for cutting through carpet with ease.
- Patience and precision in measuring and cutting ensured a fit so perfect, even Goldilocks would approve.
- Applying adhesive in sections rather than all at once allowed for greater control and less mess.
“The key to a successful carpet installation is not just in the materials you choose but in the patience and attention to detail you bring to the process,” whispered the wise voice of experience, possibly emanating from a leftover carpet roll.
Table: Lessons Learned from My Carpet Installation
| Lesson | Detail | Impact |
|---|---|---|
| Measure Twice | Ensuring accurate measurements | Avoids wastage and mismatch |
| Patience with Adhesive | Controlled application | Reduces mess and errors |
| Tools Matter | Investing in quality cutting tools | Makes cutting precise and easy |
Source: Personal Experience
Despite the challenges, the feeling of stepping back and beholding a beautifully laid carpet—free from the clutches of grippers—was immensely satisfying. It was a testament to the power of determination (and a good amount of adhesive).
🛠 Takeaway: The journey of carpet installation, especially without grippers, is filled with learning curves. Embrace the challenges, learn from your mistakes, and remember, the reward lies in the cozy, seamless finish that awaits.
Case Study: The Living Room Transformation
The crowning jewel of my gripper-less carpet installation adventure was the transformation of my living room. It went from a space with cold, hard floors to a warm, inviting area that beckoned for bare feet and cozy gatherings.
Before and After: A Visual Journey
Before the transformation, my living room had an industrial vibe that, while modern, felt unwelcoming. After, it was as if the room had put on a soft, plush sweater, instantly becoming the heart of my home.
- Before: A Spartan space with echoing steps.
- After: A sanctuary of warmth and comfort, with every step cushioned.
“Transforming a room with carpet can change not just the look, but the very feel of the space,” I mused, admiring the fruits of my labor. This project was more than just a flooring upgrade; it was a lesson in how the right carpet can redefine a living area.
Cost and Impact Analysis
Embarking on this project, I was acutely aware of my budget and the desire to get the most bang for my buck. Here’s how the numbers broke down:
Table: Living Room Transformation Cost
| Item | Cost |
|---|---|
| Carpet Material | $500 |
| Tackifier Adhesive | $75 |
| Tools and Accessories | $50 |
| Total | $625 |
Source: Personal Budgeting
The financial investment was significant but reasonable, considering the dramatic impact on the room’s aesthetics and functionality. The return on investment wasn’t just measured in dollars but in the joy and comfort the new space provided.
The Final Verdict
This project taught me that with a bit of ingenuity and hard work, transforming a space is entirely within reach. The living room, once a place of passing, became the family’s favorite hangout spot, proving the power of a well-chosen and expertly installed carpet.
🏡 Takeaway: The transformation of my living room is a testament to the fact that carpet installation, even without traditional methods, can have a profound effect on a home’s warmth and welcoming nature. It’s an investment not just in your home’s aesthetics but in its overall ambiance and comfort.
Checklist for Successful Carpet Installation Without Grippers
Embarking on a carpet installation project without traditional grippers can feel like navigating uncharted waters. To help guide you through, I’ve compiled a checklist based on my personal experience, ensuring you have everything you need for a smooth sailing installation.
- Research Your Installation Method: Choose the right adhesive method for your needs—double-sided tape, adhesive strips, or tackifier adhesive.
- Gather Your Materials: Ensure you have the carpet, chosen adhesive, and any necessary tools like scissors or a utility knife.
- Measure Your Space Accurately: This cannot be overstated. Precise measurements will save you time, material, and headaches.
- Prepare the Subfloor: Clean and ensure it’s smooth and free from debris. Any imperfections could show through your carpet.
- Cut Your Carpet: Do this carefully, according to your measurements. Remember, measure twice, cut once!
- Apply Your Adhesive: Follow the instructions specific to your chosen method for the best results.
- Lay Your Carpet: Start from one side and gradually work your way across to avoid bubbles or wrinkles.
- Trim Any Excess: Use a sharp blade for a clean cut along the edges.
- Allow Time to Settle: Some adhesives may require time to fully bond. Avoid heavy traffic on the carpet during this period.
“A well-prepared DIYer is a successful DIYer,” I often remind myself. This checklist became my mantra throughout the installation process, guiding each step with purpose and preparation.
📋 Takeaway: A successful carpet installation without grippers starts long before the carpet is laid down. It begins with careful planning, the right tools and materials, and a hefty dose of patience. Follow this checklist to ensure your project goes off without a hitch.
Frequently Asked Questions
Embarking on carpet installation without traditional grippers brings up many questions. I’ve compiled the most common queries I encountered during my journey, along with the insights I’ve gathered.
Can I Install Carpet Without Grippers?
Absolutely! Alternatives like double-sided tape, adhesive strips, and tackifier adhesives provide viable methods for installing carpet without damaging your floors with grippers.
How Long Does Carpet Installed Without Grippers Last?
The longevity depends on the method and materials used. Double-sided tape might offer a temporary solution, while tackifier adhesive can secure your carpet for years to come, rivaling the durability of traditional installations.
Will the Carpet Move or Slip Without Grippers?
If installed correctly, using the appropriate method for your space and traffic levels, the carpet should remain stable and secure. Ensuring proper adhesion and fit during installation is key to preventing movement.
Can I Use These Methods on Any Type of Floor?
Yes, but with caution. Always check the compatibility of your chosen adhesive with your flooring type. Some adhesives may not be suitable for delicate surfaces like hardwood or laminate.
How Do I Remove the Carpet Later?
Removal methods vary by adhesive. Double-sided tape and adhesive strips generally allow for easier removal than tackifier adhesive, which may require a solvent and more elbow grease. Always follow the manufacturer’s instructions for removal.
“Navigating the world of gripper-less carpet installation might seem daunting, but armed with the right knowledge and tools, it’s an entirely feasible DIY project,” I realized, reflecting on the numerous questions I had at the start of my own journey.
🔍 Takeaway: Curiosity is the first step toward mastering a new skill, including carpet installation without traditional methods. By asking questions and seeking answers, you’re laying the groundwork for a successful, gripper-free carpet installation.
Highlight Summary: Key Takeaways from My Experience
Reflecting on my journey of installing a carpet without traditional grippers, a few key lessons stand out. These insights not only shaped my project’s success but also deepened my understanding of home improvement as a blend of art, science, and patience.
- Flexibility Over Tradition: Embracing alternative methods opened up new possibilities for my flooring project, proving that tradition doesn’t always dictate the best course of action.
- Preparation Is Key: From choosing the right adhesive to precise measuring and cutting, thorough preparation laid the foundation for a smooth installation process.
- Expect and Embrace Challenges: No DIY project goes perfectly according to plan. Facing and overcoming obstacles was a crucial part of the learning curve.
- The Right Tools Make a Difference: Investing in quality tools and materials not only made the job easier but also ensured a more professional finish.
- Patience Pays Off: Rushing through the steps would have compromised the quality of the installation. Taking my time resulted in a more satisfying outcome.
“The journey of carpet installation without grippers taught me more than just about flooring; it was a lesson in patience, precision, and openness to new methods,” I mused, proud of the transformation I had achieved in my home.
🏡 Takeaway: My adventure in carpet installation, free from the constraints of grippers, revealed the importance of adaptability, preparation, and perseverance. Whether you’re a seasoned DIY enthusiast or a novice looking to update your space, these principles can guide you to success, one step at a time.
Leave a Reply