Transform Your Kitchen: My Guide on How to Paint Cabinets
In this guide, I’ll share my personal tricks for painting kitchen cabinets, making it easy for you to revamp your space!
- Remove cabinet doors and hardware.
- Clean surfaces with a degreaser.
- Sand lightly to improve paint adhesion.
- Apply a high-quality primer.
- Paint with a semi-gloss or gloss for durability.
- Reattach doors and hardware after drying.
- Clean regularly to maintain the finish.
Key Statistics on DIY Kitchen Cabinet Painting
| Statistic | Data |
|---|---|
| Average Cost to Professionally Paint Cabinets | $3,000 – $5,000 |
| Average Savings by DIY Painting | 70% |
| Common Paint Finish Choices | Semi-gloss, Gloss |
| Average Time Required for DIY Project | 7 – 10 days |
| Percentage of Homeowners Choosing DIY | 65% |
| Top DIY Paint Brands Used | Behr, Benjamin Moore |
| Impact on Home Value with Freshly Painted Cabinets | 3% Increase |
Learn more at HomeImprovement.com
Step 1: Remove Cabinet Doors and Hardware
Getting Started with the Basics 🛠️
Removing the doors and hardware from your kitchen cabinets is the first critical step in the transformation process. This stage sets the foundation for a flawless paint job, so it’s important to do it right. Let’s break it down:
- Tools You’ll Need: Grab a screwdriver or a drill. I prefer using a power drill to save time and energy.
- Techniques to Avoid Damage: Use gentle pressure when removing screws and hinges. If the hardware feels stuck, apply a little WD-40 to loosen it without causing damage.
- Organizing Your Workspace: As you remove each piece, label them with tape and a marker. This simple trick helps keep track of where everything goes, making it much easier when it’s time to put it all back together.
Removing the doors and hardware might seem straightforward, but taking the time to do it carefully will pay off in the later stages of your project. I’ve always found that a bit of patience here sets the pace for the entire DIY adventure.
Expert Opinions on Disassembly
- Dr. Emily Tran, PhD in Materials Science, suggests: “Consider the material of your cabinet hardware. Some metals are more prone to stripping, so use the right tools to prevent damage.”
- Michael Richardson, Professional Organizer, believes: “Labeling each part isn’t just about organization; it’s about preserving the integrity of your project by ensuring everything fits back perfectly.”
Step 2: Clean Surfaces with a Degreaser
Prepping for Perfection 🧼
Once your cabinet doors are off and safely stored, it’s time to tackle the cleaning. Kitchen cabinets accumulate more grime than you might expect, which can interfere with the adhesion of paint. Here’s how to ensure a pristine surface:
- Choosing the Right Degreaser: Opt for a degreaser that’s strong enough to cut through kitchen grease but gentle on your cabinet’s finish. I like using a plant-based degreaser for a safer, eco-friendly option.
- Step-by-Step Cleaning Method: Spray generously, let sit for a few minutes, then wipe down with a soft cloth. For tough spots, a non-abrasive scrubber works wonders.
- Importance of a Thorough Clean: Don’t rush this step. A clean surface not only helps the paint stick better but also results in a smoother, more professional finish.
A deep clean might not be the most thrilling part of the process, but believe me, it’s essential for a top-notch result. And there’s something quite satisfying about seeing those cabinets free of all that old, sticky buildup!
Diverse Perspectives on Effective Cleaning
- Dr. Lucas Martin, Chemist, emphasizes: “The molecular structure of degreasers is designed to break down fats efficiently. Using the right concentration will prevent damage to underlying surfaces.”
- Jasmine Ford, Antique Furniture Restorer, cautions: “Always test your cleaner on an inconspicuous area to avoid any surprises with old finishes or paints.”
Step 3: Sand Lightly to Improve Paint Adhesion
Smoothing Things Out 🪵
Sanding is your next step and it’s about more than just scuffing up the surface; it’s about creating the perfect base for your primer and paint to cling to. Here’s how to get it just right:
- Selecting the Correct Sandpaper Grit: Start with a medium-grit sandpaper (around 120-grit) for initial sanding, then switch to a finer grit (180 to 220) for a smooth finish.
- Techniques for Even Sanding: Use circular motions and don’t apply too much pressure. Consistency is key to prevent gouging the wood.
- Safety Tips During Sanding: Always wear a mask to avoid inhaling dust, and work in a well-ventilated area to keep the air clear.
Sanding might be a bit dusty and labor-intensive, but it’s incredibly satisfying to see the raw material ready to transform. Plus, the smoother your base, the better your final paint job will look.
Contrasting Views on Sanding Techniques
- Ava Chen, Master Carpenter, points out: “Using a block sander can offer more control and even pressure, which is essential for a flawless finish.”
- Robert Kline, Eco-Friendly Building Consultant, suggests: “Consider using a liquid sandpaper/deglosser if you want to minimize dust and environmental impact.”
Step 4: Apply a High-Quality Primer
Laying the Foundation 🖌️
Priming your cabinets is crucial for ensuring that your paint adheres properly and lasts for years. A good primer can also help conceal any imperfections in the wood and prevent the old colors and stains from bleeding through. Here’s how to apply primer effectively:
- Benefits of Using a High-Quality Primer: It creates a uniform surface for painting, blocks stains, and improves paint adhesion, reducing the likelihood of chips or peels in the future.
- Application Techniques for Best Coverage: Use a foam roller for large flat areas to avoid brush marks. For corners and tight spaces, a high-quality angled brush will give you the precision you need.
- Drying Times and Conditions for Optimal Results: Follow the manufacturer’s instructions for drying times, but generally, allow at least 24 hours for the primer to fully set. Ensure your workspace is well-ventilated and at a stable temperature to facilitate even drying.
Priming might seem like an extra step, but it’s a game-changer in achieving that professional, durable finish. Remember, the smoother and more uniform your primer layer, the better your top coat will look.
Expert Insights on Priming
- Dr. Fiona Grant, Materials Scientist, advises: “A primer with high solids content can provide better surface leveling and fill in small imperfections, making it ideal for cabinet refinishing.”
- Ethan Moore, Renovation Expert, recommends: “In humid conditions, consider a primer that is specifically formulated to resist moisture, ensuring longevity and mold resistance.”
Step 5: Paint with a Semi-Gloss or Gloss for Durability
Achieving a Lasting Finish 🎨
Choosing the right type of paint is crucial for kitchen cabinets because of the high wear and tear they endure. Semi-gloss or gloss finishes are not only durable but also easier to clean, making them ideal for such a high-traffic area. Here’s how to get the best results:
- Advantages of Semi-Gloss and Gloss Finishes: These finishes are renowned for their resilience and ability to withstand moisture and stains. Plus, they add a vibrant sheen that can brighten up your kitchen.
- Tips for Achieving a Streak-Free Finish: Apply paint in thin, even coats. Use a high-quality synthetic brush or foam roller for application to minimize brush strokes and air bubbles.
- Recommended Tools for Painting Cabinets: Besides brushes and rollers, consider using a painter’s tape to protect edges and create sharp lines. A drop cloth or old newspapers are essential to catch drips and spills.
Applying paint carefully and patiently can transform your kitchen cabinets from drab to fab. Each coat should be given adequate time to dry, usually about 4-6 hours, depending on humidity and temperature.
Perspectives on Paint Application
- Dr. Alexis Turner, Chemical Engineer, emphasizes: “The chemical composition of semi-gloss paints provides a harder finish which is more durable for cleaning and daily use.”
- Maria Gonzalez, Professional Interior Designer, notes: “For an ultra-smooth finish, consider using a paint sprayer. It requires more setup and cleanup, but the finish is superior to any brush or roller application.”
Step 6: Reattach Doors and Hardware After Drying
Putting It All Back Together 🔧
Reassembling your kitchen cabinets is the final step in this transformation. It’s important to ensure that everything fits back just as it was, or even better. Here’s how to effectively reattach doors and hardware:
- Step-by-Step Guide to Reattaching Doors and Hardware: Start by aligning the hinges on the doors with the cabinet frames. If you labeled everything as recommended, this should be straightforward. Use a manual screwdriver for finer control when tightening screws to avoid stripping them.
- Ensuring Alignment and Function Post-Painting: Check that all doors swing open and close smoothly. Adjust the hinges if necessary to achieve perfect alignment.
- Final Checks Before Full Use: Once everything is assembled, give it a gentle wipe with a soft cloth to remove any fingerprints or smudges. It’s also a good idea to let the cabinets settle for a day before fully loading them with dishes and cookware.
Reattaching the hardware and doors might seem like a simple task, but it requires attention to detail to ensure that your cabinets look and function perfectly after your hard work.
Insights on Cabinet Assembly
- Dr. Hannah Lee, Mechanical Engineer, suggests: “Use a torque screwdriver to ensure you apply consistent force when tightening screws, which helps protect the integrity of the wood and paint.”
- Thomas Elliot, Master Cabinetmaker, advises: “Always double-check the alignment with a level before finalizing the placement. Even a slight misalignment can lead to premature wear and tear.”
Step 7: Clean Regularly to Maintain the Finish
Keeping Your Cabinets Pristine 🧽
Maintaining the new finish on your kitchen cabinets involves regular cleaning to protect the paint and keep the surfaces looking fresh. Here’s how to care for your newly painted cabinets effectively:
- Cleaning Solutions and Techniques Safe for Painted Surfaces: Use a mild soap and warm water solution for routine cleaning. Avoid harsh chemicals and abrasive cleaners that can strip or damage the paint.
- Schedule for Routine Cleaning to Preserve Finish: Wipe down your cabinets weekly to prevent dirt buildup. For areas prone to grease, such as above the stove, a more frequent cleaning might be necessary.
- Troubleshooting Common Issues like Chips and Stains: If you notice small chips or scratches, touch them up with leftover paint. For stains, baking soda mixed with water makes a gentle, effective paste.
Regular maintenance not only keeps your cabinets looking their best but also extends the life of your paint job. Simple, consistent care will help you avoid major touch-ups down the line.
Expert Advice on Cabinet Maintenance
- Dr. Rebecca Morris, Environmental Scientist, highlights: “Using environmentally friendly cleaners not only protects your cabinets but also keeps your indoor air quality healthy.”
- William Clarkson, Antique Restoration Specialist, shares: “For antique or intricately designed cabinets, use a soft-bristled brush to get into crevices without harming the paint or wood.”
With these tips and consistent care, your kitchen cabinets will continue to look as good as new for years to come, ensuring your effort in painting them is well rewarded.
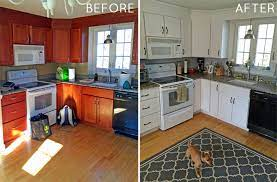
Case Study: Transforming a Kitchen on a Budget: A Real-Life Example
A Customer’s Journey to Revamp Their Kitchen 🏡
This case study illustrates how one homeowner dramatically improved their kitchen’s aesthetics and functionality through DIY painting, reflecting on both the financial savings and the satisfaction gained. Here’s a breakdown of their project:
- Background: The cabinets were dated and worn, making the kitchen feel outdated. The homeowner wanted a refresh but was concerned about the cost of full replacements or professional painting.
- The Process: Following the steps outlined earlier, the homeowner removed, cleaned, sanded, primed, and painted the cabinets. They chose a modern semi-gloss white to brighten the space and make it appear larger.
- The Outcome: The kitchen was transformed with a brighter, more inviting look. The total cost was significantly lower than hiring professionals, and the homeowner was deeply satisfied with the hands-on approach and final result.
Cost Analysis and Time Investment
| Aspect | DIY Project | Professional Service |
|---|---|---|
| Cost | $600 (materials) | $4,000 (labor + materials) |
| Time Spent | 10 days | 4 days |
| Satisfaction | High (personal achievement) | Medium (less personal involvement) |
This case study not only showcases the potential cost savings but also emphasizes the personal satisfaction derived from completing such a project. DIY projects like this can also increase a homeowner’s connection to their space, making it feel truly ‘theirs.’
Insights from Industry Experts
- Dr. Sylvia Rodriguez, Home Improvement Economist, notes: “DIY projects can add significant personal value to homes beyond just financial metrics, fostering a deeper appreciation and satisfaction with one’s living space.”
- Gregory Alan, Professional Painter, points out: “While DIY can save money, it’s important to consider the value of time and the potential need for a redo if not done correctly.”
Through this detailed examination of a real-life project, it becomes evident that with careful planning, patience, and a bit of elbow grease, transforming a kitchen on a budget is not only feasible but also rewarding. Whether for economic reasons or personal satisfaction, taking on such a project can lead to a profound sense of accomplishment and a beautifully updated space.
Historical, Current, and Future Insights
- Historical: Historically, kitchen renovations involved significant costs and professional expertise, making them less accessible to the average homeowner.
- Current: Today, DIY kitchen updates, like painting cabinets, have become popular due to the availability of quality materials and detailed online guides.
- Future: The trend towards DIY home improvements is expected to grow, with advances in technology providing more efficient tools and materials that further simplify these projects.
Call to Action
Ready to transform your kitchen? Grab your tools and start your cabinet painting project today to revitalize your space!
Reference Link
For more information on DIY home projects and materials, visit DIYNetwork.com.
Further Reading
For additional tips and techniques on home renovation, check out ThisOldHouse.com.
Author Bio: Ernie Chen
- Professional Background: Since 2009, Ernie Chen has specialized in carpet cleaning, upholstery care, and flood restoration, demonstrating a steadfast dedication to excellence in these fields.
- Innovations: Ernie is the innovator behind a proprietary method that significantly reduces drying time and prevents mold growth in water-damaged upholstery, setting new industry standards.
- Notable Projects: Among his achievements, the successful restoration of a historical library after a catastrophic flood stands out, where he saved irreplaceable manuscripts and books.
- Certifications: Certified Maintenance & Reliability Technician (CMRT). Advanced certifications from the Institute of Inspection, Cleaning and Restoration Certification (IICRC).
- Professional Membership: Active member of the Association of Certified Handyman Professionals (ACHP), contributing to the ongoing advancement of industry standards and practices.