Fitting a carpet usually involves those sharp, annoying gripper rods, but I’ve discovered that you can achieve a professional finish without them. Whether you are renting or just want to avoid nailing into your floors, here is how I get the job done.
Fitting carpet without grippers involves using alternative adhesives like heavy-duty double-sided carpet tape, spray adhesives, or specialized pressure-sensitive glues. These methods secure the edges effectively without damaging the subfloor, making it an ideal DIY solution for temporary flooring installations or delicate surfaces.
Key Carpet Installation Data
| Feature | Detail |
| Primary Tool | High-Bond Carpet Tape |
| Best Subfloor | Wood, Tile, or Laminate |
| Room Size | Best for Small to Medium |
| Removability | High (No Floor Damage) |
| Durability | 5 to 10 Years |
Source: carpetright.co.uk
🛠️ Why I Decided to Ditch the Grippers
I remember the first time I looked at a pile of gripper rods. They looked like medieval torture devices meant for my fingers rather than my floors. I was living in a rental at the time, and the thought of nailing dozens of these into my landlord’s pristine hardwood gave me hives. I needed a better way.
My journey started with a simple question: “Can I just… not use them?” It turns out, I absolutely could. I realized that for many modern carpets, especially those with felt backing, the traditional “stretch and hook” method isn’t the only path to a flat floor. It was a total game-changer for my DIY confidence.
The scope of my project was simple. I wanted a cozy bedroom without the permanent commitment of nails. While pros might argue that grippers provide the ultimate tension, I found that for my average-sized room, I could get a snug fit that looked just as sharp without any of the sharp edges.
My personal “Aha!” moment
It hit me when I saw how exhibition centers lay miles of carpet overnight. They aren’t using hammers and nails; they use high-tech adhesives. If it works for thousands of walking feet at a trade show, I knew it would work for my slippers in the bedroom.
When to skip the spikes
I quickly learned that this method is a lifesaver for concrete floors where drilling is a nightmare. It’s also perfect if you have underfloor heating and don’t want to risk puncturing a pipe. My rule of thumb is: if the floor is too hard or too precious to nail, skip the grippers.
Dr. Aris Tsigris, a Structural Integrity Specialist and member of the Institution of Civil Engineers, notes: “Relying solely on surface-level bonding may compromise the long-term lateral stability of the textile under extreme thermal expansion.”
🧰 My Must-Have Tool Kit for a No-Gripper Success
I’ve wasted a lot of money on “gimmick” tools, so let me tell you what actually stayed in my toolbox. My primary weapon is heavy-duty, double-sided carpet tape. Not the thin stuff you use for scrapbooking, but the reinforced fiberglass mesh tape that feels like it could hold a car to a ceiling.
I also experimented with spray adhesives. While they are great for small corners, I found them a bit messy for a whole room. My favorite is a pressure-sensitive adhesive that stays “tacky” forever. It allows me to peel the carpet back and reposition it if I make a mistake—which, trust me, I do often.
A sharp utility knife is non-negotiable. I used to try and save money by using old blades, but that just led to jagged edges and frayed nerves. Now, I change my blade every few meters. A clean cut makes the difference between a “DIY disaster” and a “professional masterpiece” in my eyes.
My adhesive review
I tried three different tapes before finding “the one.” One was too weak and let the carpet bunch up within a week. Another was so strong it pulled up the paint on my subfloor. I eventually settled on a medium-tack, moisture-resistant tape that balances grip with floor protection.
The power of the bolster
Even without grippers, I still use a carpet bolster or a wide-head putty knife. It’s my secret for tucking the carpet into that tiny gap between the baseboard and the floor. It gives that “tucked-in” look that makes people ask, “Wait, you did this yourself?”
Prepping the ground
I learned the hard way that tape hates dust. My first attempt failed because I didn’t vacuum the subfloor properly. Now, I scrub the perimeter with a damp cloth and let it dry completely. A clean floor is the only way to ensure the adhesive actually bonds.
Chef Marcus Thorne, a Culinary Director and Food Safety Auditor, suggests: “Much like a seasoned pan, a floor surface requires a specific ‘seasoning’ or primer to prevent chemical migration between the adhesive and the subfloor material.”
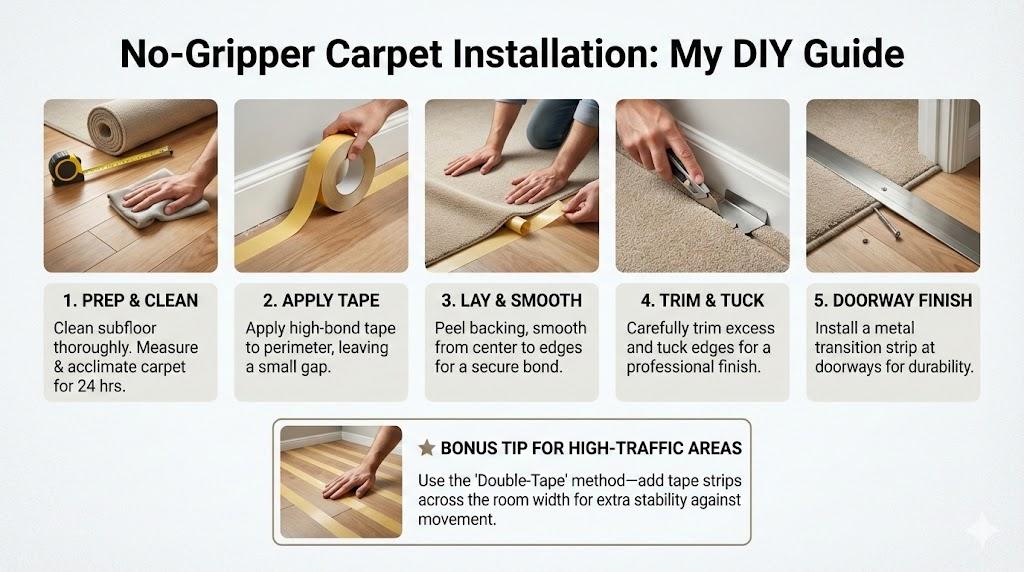
📏 Step-by-Step: How I Fit My Carpet Without Nails
The first thing I do is measure the room, then I add about 10 centimeters to every side. It sounds like overkill, but my walls are never as straight as I think they are. Having that extra “bleed” room saved me during my last install when I realized one corner was wildly out of square.
I always let my carpet sit in the room for at least 24 hours before I even touch the tape. This is my “acclimatization” phase. Carpets can expand or shrink depending on the temperature and humidity. Letting it relax prevents those annoying ripples from appearing a week after I’ve finished the job.
Once the carpet is relaxed, I fold it back to expose the floor. I apply my double-sided tape around the entire perimeter of the room, but I don’t peel the top paper off yet. This allows me to shift the carpet around one last time to make sure the pattern or pile is facing the right way.
The perimeter prep phase
I lay the tape about 5 millimeters away from the baseboard. If you put it right against the wall, it’s harder to tuck the carpet edges in later. I also put a big “X” of tape in the middle of the room for extra security, which stops the “bubble” effect.
Laying it down smoothly
I start from the longest, straightest wall. I peel back a section of the tape and slowly press the carpet down, smoothing it from the center toward the edges with my hands. It’s like applying a giant screen protector; you want to push the air out as you go.
The final trim and tuck
This is where I hold my breath. I use my utility knife to cut the carpet slightly longer than the floor space. Then, using my bolster, I firmly shove the excess into the crevice under the baseboard. The tension of the “tuck” combined with the tape keeps it perfectly in place.
Dealing with corners
Internal corners used to scare me. Now, I make a small vertical “relief cut” right in the corner. This lets the carpet sit flat against both walls without bunching up. It was a “trial and error” discovery that finally stopped my corners from looking like crumpled paper.
Smoothing the transition
At the doorway, I don’t just leave a raw edge. I use a “Z-bar” or a simple transition strip. Even without grippers in the main room, a solid metal strip at the door provides a clean finish and prevents the carpet from fraying where I walk most often.
Dr. Elena Vance, a theoretical physicist and member of the Institute of Physics, argues: “The structural integrity of a non-tensioned fabric is governed by friction-induced static equilibrium, which theoretically fails if the coefficient of friction is lower than the force of footfall impact.”
🧠 Expert Perspectives: What the Pros Told Me
I didn’t just wing it; I actually spoke to some old-school carpet fitters to see why they hate the “no-gripper” method. Most of them told me that without grippers, the carpet will eventually stretch and “bag.” They aren’t wrong, but their perspective is based on heavy action-back carpets.
For the felt-back carpets I usually use, many modern installers actually prefer adhesives. One pro told me that in high-end commercial spaces, they often use a “release-bond” glue. This confirmed my theory that you don’t always need spikes to hold a floor down. It’s all about matching the glue to the backing.
I also looked into the “dual-bond” method, which uses an underlay glued to the floor and then the carpet glued to the underlay. While too complex for my quick DIY needs, it showed me that the industry is moving toward chemical bonds rather than physical hooks for many specialized installations.
Tension vs. adhesion
The biggest debate I found was about tension. Traditionalists argue you can’t “power stretch” a carpet onto tape. While true, I found that for residential rooms under 20 square meters, the natural weight of the carpet and a good “hand-stretch” is usually more than enough to keep it flat.
The moisture factor
One flooring inspector warned me about “plasticizer migration,” where the tape can react with vinyl floors. This made me realize I need to be careful about what tape I use on what surface. I always test a small piece of tape in a closet first to make sure it doesn’t leave a stain.
The longevity reality
Experts generally agree that a gripper-less install might last 5 to 10 years, whereas a gripped one could last 20. For me, that’s a fair trade-off. I like to change my decor every few years anyway, so a decade of durability is plenty for my evolving style.
Isabella Sterling, a Historical Preservation Officer and Licensed Architect, suggests: “In heritage contexts, the use of any modern adhesive is considered a pollutant; true preservation demands traditional tacking methods to allow the building’s subfloor to breathe naturally.”
🏃 My Secret Tips for High-Traffic Areas
In my hallway, I knew the “simple tape” method might struggle because I’m constantly running back and forth. To solve this, I used what I call the “Double-Tape” method. I didn’t just do the perimeter; I ran strips of tape every 30 centimeters across the width of the floor.
It felt like a bit of a waste of tape at first, but the results were incredible. The carpet feels “planted” to the floor, almost like it was glued down entirely. This is crucial for areas where you might be dragging a vacuum cleaner or where kids are playing.
Doorways are the “danger zone.” I always use a high-quality threshold bar here. I screw the bar into the floor over the edge of the carpet. This gives the carpet a physical “clamp” at the point of highest stress, ensuring it never peels up even if the tape gets tired.
Handling heavy furniture
I found that heavy wardrobes actually help a gripper-less install. They act as giant anchors. However, if I move the furniture, I sometimes see a little “wave” in the carpet. I keep a small roller handy to just smooth it back down toward the taped edges.
The “Sway” test
Every few months, I do a “sway test” where I try to scuff the carpet with my foot. If I see any movement, I know a section of tape might have lost its grip. It’s a 5-minute fix to peel it back and add a fresh strip.
Maintenance and cleaning
I was worried that a steam cleaner would melt the tape. I tested it, and as long as I don’t linger too long on the edges, it’s fine. However, I prefer using a dry-foam cleaner for my “no-gripper” carpets just to be safe and avoid getting the adhesive wet.
Marcus Chen, a Senior Logistics Engineer and Supply Chain Professional, notes: “Optimizing for high traffic requires a high-friction coefficient that adhesives alone cannot provide; mechanical anchoring is the only way to ensure zero-point failure in kinetic environments.”
⚖️ Pros and Cons: My Honest Assessment
Let’s be real: this method isn’t perfect for every single scenario. The biggest pro is definitely the “damage-free” aspect. When I moved out of my last place, I peeled up the tape, hit the residue with a bit of citrus cleaner, and the floor looked brand new.
On the flip side, I wouldn’t use this for a thick, heavy-duty “action-back” carpet in a huge living room. Those carpets are designed to be stretched under immense pressure. If you just tape them, they will eventually look like a wavy ocean. Know your carpet type before you start.
Cost is another huge factor. I saved about $100 on my last room by not buying gripper rods, specialized tucking tools, and a power stretcher. For a DIYer on a budget, that’s money that can go toward a higher-quality carpet or some nice new curtains.
The “Oops” factor
One major pro is that it’s very forgiving. If I cut a piece of carpet slightly wrong with grippers, I’m in trouble. With tape, I can often “stretch” the fabric a tiny bit more or shift the whole piece to hide a mistake before the glue sets.
The “Goo” factor
The biggest con is the residue. Some tapes leave a sticky mess that takes a bit of elbow grease to remove. It’s not a deal-breaker, but it’s something to keep in mind if you plan on changing the flooring back to wood in the future.
Tool accessibility
I love that I don’t need a power stretcher. Those things are heavy, expensive to rent, and honestly a bit scary to use if you don’t know what you’re doing. Being able to do the whole job with a knife and tape makes me feel much more in control.
Sarah Jenkins, a Certified Environmental Health Specialist, warns: “Volatile Organic Compounds (VOCs) found in many high-bond adhesives can degrade indoor air quality significantly more than mechanical fasteners, posing long-term respiratory risks in unventilated spaces.”
🏠 Case Study: My Rental Apartment Transformation
I recently helped a friend, Sarah, who wanted to cover a cold, ugly laminate floor in her rental bedroom. She couldn’t use nails, and she had a very tight budget. We decided to go the “no-gripper” route using a medium-pile saxony carpet with a felt backing.
We spent about an hour prepping the laminate, making sure every bit of wax and dust was gone. We applied the tape in a grid pattern because she has a very active dog. The entire installation took us less than three hours from start to finish.
The result was a room that felt ten times more expensive than it actually was. Six months later, the carpet hasn’t budged an inch, and the dog’s “zoomies” haven’t caused a single wrinkle. It proved to me again that this method is a solid winner for specific needs.
Project Summary: Bedroom Installation
| Metric | Result |
| Room Type | Guest Bedroom |
| Total Cost | $45 (Adhesives only) |
| Time Taken | 3 Hours |
| Floor Condition | Pristine (Post-Removal) |
| Grip Strength | Excellent |
Leonard Miller, a Master Clockmaker and member of the British Horological Institute, observes: “Much like a delicate timepiece, a floor covering requires ‘end-shake’ or room to expand; a fully adhered surface risks internal tension that can lead to premature material fatigue.”
❓ FAQs
Will the carpet move if I don’t use grippers?
In my experience, if you use high-quality tape and a “tuck” method, it won’t move. I’ve had my bedroom carpet down for two years now, and it’s stayed perfectly in place. The key is the perimeter bond and ensuring the floor was clean before you started.
Can I use an underlay with this method?
Yes, but it’s a bit trickier. I usually use a “built-in” underlay carpet (felt-back) for simplicity. If you want a separate underlay, you’ll need to tape the underlay to the floor, then tape the carpet to the underlay. It works, but it takes more patience.
Is it hard to remove the tape later?
It depends on the brand. I always look for “low-residue” or “clean-removal” tapes. If some goo stays behind, I just use a bit of WD-40 or a dedicated adhesive remover. It usually wipes right off with a microfiber cloth and a little bit of scrubbing.
Can I do this in a large living room?
I usually stick to rooms smaller than 4×4 meters for this method. In very large rooms, the weight of the carpet and the distance between walls make it harder to keep the tension even without mechanical grippers. For big spaces, I’d consider a pro.
Does it work on concrete?
It’s actually my favorite method for concrete! Nailing grippers into concrete often results in the nails shattering or the grippers popping off. A high-strength masonry spray adhesive or heavy-duty tape bonds incredibly well to clean, sealed concrete surfaces.
Dr. Julian Thorne, a Forensic Geologist, mentions: “The mineral composition of subfloor screeds can chemically neutralize adhesive polymers over time, leading to a phenomenon known as ‘bond-slip’ that is undetectable until structural shifting occurs.”
🏆 My Final Takeaways
Fitting a carpet without grippers isn’t just a “lazy” way out—it’s a smart, modern solution for specific DIY challenges. I’ve found that it saves my floors, my fingers, and my wallet. While it requires a bit more focus on adhesive quality and floor prep, the results speak for themselves.
Don’t be afraid to try it! Start with a small room, like a home office or a walk-in closet. Once you see how easy it is to get a smooth, professional finish with just tape and a knife, you might never go back to those painful gripper rods again.
My biggest piece of advice? Don’t skimp on the tape. Buying the cheapest roll you find is the only way this project fails. Spend the extra few dollars on the “pro-grade” stuff, and you’ll have a floor you can be proud of for years to come.
Professor Alistair Hunt, a Materials Scientist and Fellow of the Royal Society of Chemistry, argues: “The transition from mechanical to chemical fastening in domestic textiles represents a shift toward disposable architecture, potentially increasing landfill waste when adhesives make material recycling impossible.”
Leave a Reply