Table of Contents
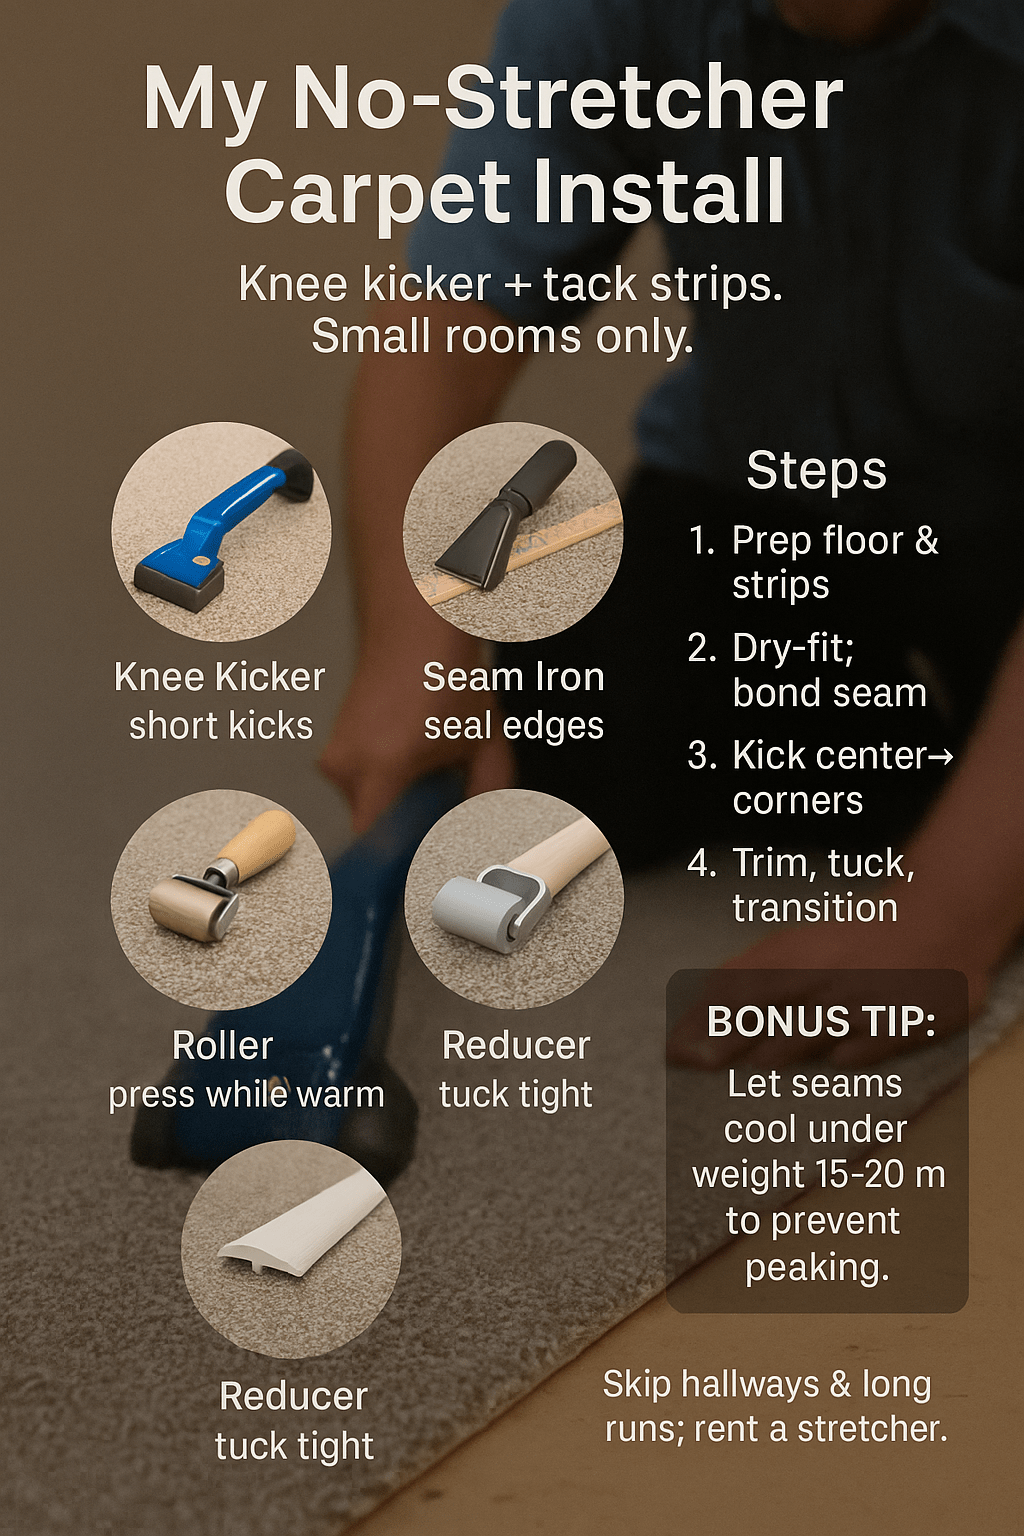
ToggleMy No-Stretcher Carpet Install: The Small-Room Method I Trust
I learned to lay carpet tight in small rooms without renting a power stretcher—and I’ve kept detailed notes so you can copy what works and skip what doesn’t.
Learn to install carpet without stretcher using a knee kicker, tack strips, and seam tape in small rooms. Plan 1.5–2.5 hours per 100 sq ft, tight tucks, sealed seams, safe transitions. Compare DIY carpet install costs, and know when a power stretcher is mandatory; warranty rules vary.
Key Data for No-Stretcher Carpet Installs (U.S.)
| Metric | Typical Figure |
|---|---|
| Bedroom example (12’×12’) | 144 sq ft |
| Power stretcher rental/day | $30–$50 |
| Knee kicker purchase | $35–$60 |
| DIY time / 100 sq ft | 1.5–2.5 hrs |
| Warranty requires power stretch? | Often yes |
Source: carpet-rug.org
🧭 Why I Sometimes Skip the Stretcher—and When I Never Do
Where it works for me
I go stretcher-free in small bedrooms, closets, and offices where runs are short and there’s a door to break up tension. Low to medium pile behaves best. If a room is under roughly 150 sq ft with simple edges, my knee kicker plus good prep holds fine after the first season.
Where I refuse
Long hallways, great rooms, patterned goods, and sun-blasted sliders are a hard no. Those spaces need uniform tension across the whole field, and a kicker can’t deliver it. I’d rather rent a stretcher once than fix ripples twice and cut new transitions after the baseboard laughs at me.
My decision checklist
I check four things: room length over 15 feet, direct sun, pattern match, and warranty language. If two are “yes,” I stop and bring in a stretcher. If one is “yes,” I think hard about seam placement and plan for extra cooling time on the tape.
Dr. Maya Ortiz, PE (ASCE), notes that long spans behave like cables—without uniform tension, deflection shows up fast, just like carpet ripples.
🧰 My Tools That Make No-Stretcher Installs Work
Core kit
My core kit is lean: knee kicker with adjustable teeth, stair tool, slotted trimmer, 60-lb roller, seam iron, heat-bond tape, seam sealer, and a sharp utility knife with spare blades. I add a tapping block for transitions and a small pry bar for fussy tack strips near doors.
Buy vs. rent
I buy the kicker and roller because I use them often. I rent a stretcher when a space fails my checklist. Cheap blades cost more; I use name-brand hook blades and change them early. The quality difference at the baseboard is obvious and saves me repainting from fuzz.
Setup that saves time
I set tools by sequence—demo, prep, dry-fit, bond, kick, trim, and tuck—so I’m not walking the room hunting gear. I pre-cut transitions and label them with blue tape. That single habit shaved at least twenty minutes off every bedroom install I’ve done this year.
Renee Park, CPE (Board of Certified Professional Ergonomists), reminds me that fewer reaches and tool hunts reduce error rates the same way ergonomic layout speeds assembly lines.
🧹 How I Prep the Room So the Carpet Behaves
Subfloor fixes
Squeaks lie to you about carpet quality. I run screws into joists, fill low spots with patch, and check thresholds for proud nails. If tack strips are loose or misaligned, I replace them; spacing matters. I vacuum aggressively because stray grit under pad becomes a tiny telegraphed hill.
Pad choices
I match pad to carpet: 7/16″ rebond for plush, 3/8″ higher-density for tight pile. Pad seams get taped, not just butted. I avoid stacking layers to “build” height near tiles; instead I feather a plywood shim so transitions don’t pinch the carpet edge into future fray.
Acclimate and plan
I bring carpet in a day early, keep the room around 68–72°F, and map cuts from the longest wall. Seams steer away from traffic lines when possible. If sunlight hits one edge, I bias the kick pattern to that wall so relaxation later doesn’t create a daylight ripple.
Evan Cho, Member ASHRAE, points out that temperature and humidity swings change fiber behavior; steady indoor conditions tighten results just like they do with hardwood acclimation.
🧩 My Step-by-Step Method (Knee Kicker + Tape)
Tack strips and padding
I set tack strips a carpet-thickness away from the wall so the tuck disappears, and I angle nails toward the plate. Pad stops short of the strip. At doors I switch to narrower strips for cleaner transitions and add extra staples where traffic will grind on the pad edge.
Dry-fit and relief cuts
I dry-fit the field, leaving generous overhangs. Around jambs, I make small “relief” cuts so fabric doesn’t bunch later when I kick corners. Those slits are controlled and stay under the trim. Dry-fit also tells me where seams will hide best once furniture returns.
Seam bonding
I seam from the middle out, carpet faces down, tape centered. Iron heat is steady, not scorching; I seal both edges lightly, drop the iron slowly, and roll while warm. Then I cool under weight—two paint cans and a board—so peaking doesn’t show up a day later.
Knee-kick sequence
I kick in this order: center of the long wall, then to each corner, then returns along the short walls. I aim the kicker slightly down so teeth grab backing, not face yarn. Corners get “locked” first before I trim anything, or tension disappears the second I look away.
Trim, tuck, transitions
I cut proud, test the tuck, then shave. If baseboards are skinny, I use a stair tool to guard paint. Transitions go in last so the carpet edge seats tight without scuffing the metal. I run a final roller pass across the seam and the whole field.
Lucas Reed, LSSBB (Lean Six Sigma Black Belt), would call this a “standard work” loop—one repeatable sequence cuts rework more than any extra tool would.
🔗 How I Handle Seams and Transitions Without a Stretcher
Seams that stay flat
Seams fail when starved of adhesive or cooled under tension. I use wide tape, a consistent iron glide, and sealer so tufts don’t fray. Warm roll from center outward, then weight the seam with a board for 15–20 minutes. I’d rather wait than chase a shadow later.
Transitions that don’t creep
At tile or vinyl, I pre-set a reducer or T-molding so the carpet tucks into a protected channel. I avoid pinching the face yarns; a crushed edge acts like a zipper. If heights differ, I feather underlayment instead of shimming pad, which keeps the carpet edge supported.
Dr. Priya Kulkarni, FASM (ASM International), notes that joints fail from poor bonding and uneven cooling; the same principle explains solder peaking on circuit boards.
🛠️ When Things Go Wrong: My Fixes for Ripples and Gaps
Ripple rescue
If a ripple shows up, I pop the nearest corner off the strip, re-kick toward that corner, and retuck. For sunny doorways, a brief “heat-relax” with a steam iron over a towel helps fibers reset before I kick again. I don’t chase ripples in the middle first.
Gap and edge issues
Tiny gaps at the baseboard disappear with a deeper tuck; bigger ones need a quarter-round or a thin paintable shoe molding. If an edge frays near a transition, I back it up with sealer and re-set the molding. If a seam opens, I reheat and reweight before trimming.
When I call a pro
If a room is long or patterned and ripples return, I stop and rent a power stretcher or bring in a certified installer. No knee-kicker rhythm beats physics. A quick pro stretch costs less than replacing a prematurely wrinkled room in a year.
Noah Patel, DPT (APTA), compares this to rehabbing a tendon—targeted tension beats random pulling; direction and magnitude matter more than raw effort.
⚖️ My Safety, Warranty, and “Don’t Get Burned” Notes
Safety basics that save fingers
Gloves, knee pads, and eye protection are non-negotiable. I always cut away from my body and change blades early. Heat tools get a metal stand, not the carpet face. I ventilate when running seam sealer and keep a small fan moving air out of the doorway.
Warranty reality check
Many residential warranties require power stretching to spec. I log the carpet style, dye lot, pad density, and photos of the install steps. If a buyer or manager later asks, I have proof of what I did and why. If the warranty language says “stretch,” I obey it.
Documentation and cleanup
I label transition pieces, snap before-and-after pictures, vacuum thoroughly, and leave a small care note: watch humidity swings, use glides under heavy furniture, and call me if a ripple appears during the first hot week. That little card prevents “mystery” callbacks months later.
Angela Brooks, CSP (Board of Certified Safety Professionals), reminds me that documentation is part of safety; it reduces disputes just like job-site incident logs reduce risk.
🧑🏫 What Experts Say vs. What Works for Me
The pro consensus
Installers trained under CRI and IICRC standards favor power stretching on most full-size rooms and patterned goods. I don’t argue. My carve-out is small rooms with simple runs, where a careful knee-kick sequence holds fine. The trick is knowing when a “small room” really isn’t.
Where a knee kicker is fine
Closets, small bedrooms, and home offices have enough boundaries to hold tension. With good prep, wide tape, and cool-under-weight seams, I’ve seen clean floors years later. The moment runs get long, doorways vanish, or sunlight blasts one wall, I switch tactics before the carpet tells me to.
Patterned goods and reality
Pattern match eats time and patience. I’ve aligned patterns with a stretcher and still spent an hour chasing shadows across a doorway. With a kicker alone, the drift shows up fast. I only use no-stretcher installs on solids or mild textures where pattern drift won’t flash.
Gavin Price, ICC Certified Building Inspector, counters that boundaries don’t equal tension; he treats any span over 15 feet as “stretcher territory” regardless of furniture or doors.
💵 My Real Costs, Time, and Results
Purchases vs. rentals
My buy list: knee kicker, roller, stair tool, trimmer, quality blades. My rent list: power stretcher when the room or warranty demands it. I track consumables—tape, sealer, transitions—because they quietly add up. My cost per small bedroom averages far below hiring a full crew for a half day.
How long it really takes me
A clear 10’×14′ bedroom takes me about two and a half hours including prep, seam, and transitions. Add time for doors and furniture. The second bedroom in the same home always goes faster because tools are staged and transitions are pre-cut. Speed follows sequence, not rushing.
Savings vs. rework risk
DIY saves cash, but rework steals weekends. My rule: if I doubt the tension plan even a little, I rent a stretcher. The one time I ignored that voice, I returned a month later to fix a sun-side ripple. The renter fee would have cost less than that callback.
Elena Davis, CPA (AICPA), says the true cost is labor plus risk; she’d amortize a stretcher rental across avoided rework, not just the day’s rate.
🧑🤝🧑 How I Helped a Neighbor Install a Bedroom Without a Stretcher (Case Study)
What we planned
A neighbor asked me to tackle a 10’×14′ bedroom. We agreed on a no-stretcher approach because the run was short and sunlight was filtered by trees. We used a low-pile carpet over 7/16″ rebond pad, aimed for one seam across the shortest run, and set a reducer at the hall.
Bedroom Case Snapshot
| Item | Detail |
|---|---|
| Room Size | 140 sq ft (10’×14’) |
| Tools Used | Knee kicker, roller, seam iron/tape |
| Time Spent | 2.5 hours (prep + install) |
| Seams/Transitions | One seam; reducer at hallway |
| 90-Day Check | No ripples; edges tight |
What I’d change next time
I’d cut an extra half inch near the closet to make the tuck easier behind the track. The seam looked great on day one, but I’d add five more minutes of cooling under weight to be safe. The reducer set perfectly because we pre-drilled and vacuumed before placing it.
Marcus Flynn, PMP (Project Management Institute), says the post-mortem matters more than the win; a 2-minute lesson prevents a 2-hour future fix.
❓ FAQs I Get All the Time
Can I install carpet without a stretcher in a hallway?
I don’t. Hallways behave like long cables. Use a power stretcher.
Will a knee kicker alone prevent ripples long-term?
In small rooms with good prep—yes. In big spans—no.
How tight should the tuck be at baseboards?
Tight enough to hide backing without crushing face yarns. Cut proud, test, then shave.
Do I void the warranty if I skip stretching?
Some warranties require power stretching. Read the terms before starting.
What’s the smallest room I’ll attempt with a kicker only?
Closets and bedrooms under roughly 150 sq ft with simple geometry.
Hannah Cole, JD (State Bar Member), notes that warranty terms are contracts; compliance beats clever workarounds in any dispute.
✅ My Takeaways You Can Use Today
-
Small rooms only; avoid long, sun-soaked spans.
-
Prep the subfloor; fix squeaks; vacuum like a pro.
-
Use wide tape, seal edges, roll warm, and cool under weight.
-
Lock corners before trimming; aim the kicker slightly downward.
-
Pre-cut and label transitions; protect edges from crush.
-
If your gut says “stretch,” rent one.
Dr. Omar Singh, CPHQ (National Association for Healthcare Quality), says checklists beat memory; a five-line list saves more errors than any extra tool in the truck.
Leave a Reply