My No-Sew Upholstery Playbook: How I Refresh Furniture Without Stitching
I turn tired chairs and benches into clean, tight, modern pieces—without touching a sewing machine.
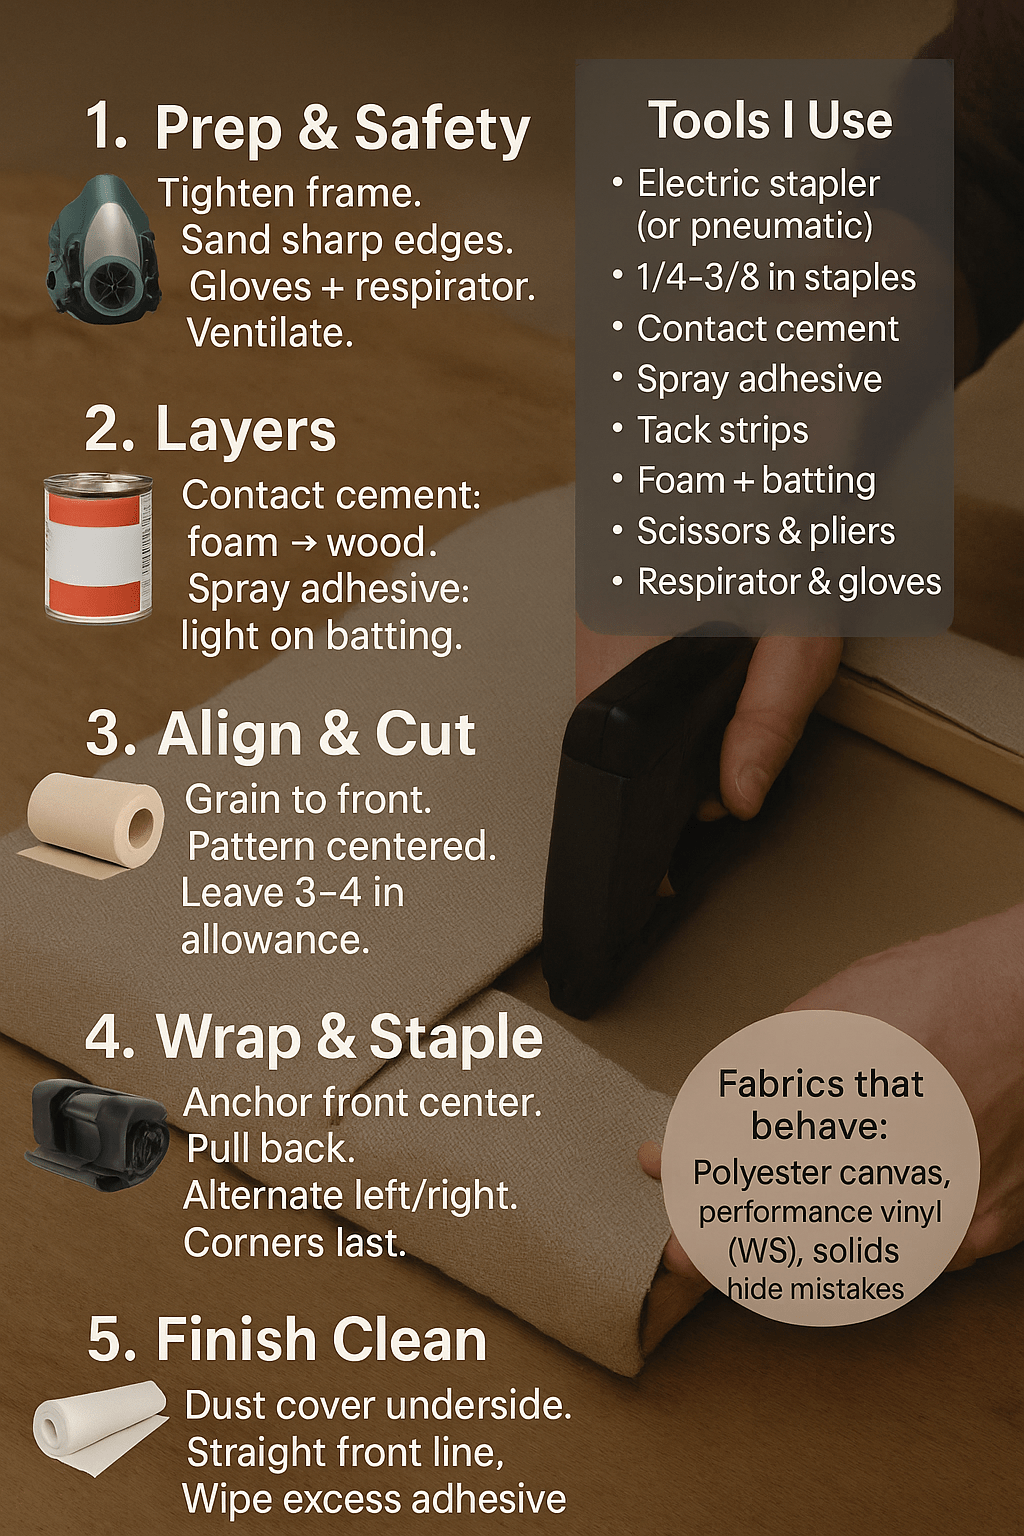
Learn how to do upholstery without sewing at home: beginner tools, materials, and steps. This guide compares no-sew upholstery techniques, costs, and durability, showing when fabric glue and staple gun beat stitching for speed, strength, and easy fixes.
No-sew upholstery uses foam, batting, staples, and contact/spray adhesive to re-cover seats, headboards, and benches. Typical chair projects take 30–60 minutes, cost $15–$40 in materials, and last around 2–5 years in light residential use if frames are sound and fabric is durable. Most beginners start with polyester blends or vinyl that can handle tension and cleanup.
Quick Stats for No-Sew Upholstery (Phone-Friendly)
| Metric | Typical Range / Note |
|---|---|
| Time to re-cover a dining chair | 30–60 minutes |
| Material cost per chair | $15–$40 |
| Common fasteners/adhesives | Staples, contact cement, spray adhesive |
| Expected lifespan (light use) | ~2–5 years with good prep |
| Easy starter fabrics | Polyester canvas, poly/cotton, performance vinyl |
Source: thisoldhouse.com
🚀 Why I Choose No-Sew First
I reach for no-sew methods when a room needs a quick, clean refresh and the frames are healthy. Staples and adhesives give me fast tension, tidy corners, and repeatable results. In rentals or kid zones, the ability to rewrap in an hour matters more than couture seams—looks great, holds tight, and stays practical.
I still sew when a cushion cover needs frequent washing, when a welt is the design hero, or when a fabric has a loose weave that won’t grip staples. For most wood-base seats, headboards, and benches, no-sew wins on time, cost, and learning curve. Strong prep—clean frames, scuff-sand edges, and measure twice—makes the work look pro, not “crafty.”
“Speed isn’t a substitute for structure,” notes Evan Lee, ASID (American Society of Interior Designers), who favors no-sew for tight wraps but reserves sewing for removable, launderable covers.
🧰 My No-Sew Toolkit (No Machine Needed)
Staple Guns and Staples
I started with a manual gun. It works—but my hands got sore and staples sat proud. A light pneumatic or high-quality electric stapler changed everything: deeper penetration, fewer jams, cleaner lines. I stock 1/4″–3/8″ staples for seats, and longer sizes for thick batting or hardwood frames.
Adhesives That Actually Bond
Contact cement (foam to wood) gives me reliable tack; spray adhesive helps position batting without lumps. I apply in thin, even coats, wait for tack time, then press once—no sliding. Fabric tape is handy for hidden hems only. I avoid hot glue on large spans; it leaves ridges and fails under heat.
Padding, Layers, and Finishing
Foam sets comfort; batting softens edges; a dust cover finishes the underside and blocks crumbs. I cut foam flush, wrap with batting to soften corners, then pull fabric tight. Tack strips help on straight edges where I want a stitch-free “factory” look without a staple line.
Safety & PPE
Gloves keep my knuckles safe around frames. I wear safety glasses and use a respirator when spraying solvent-based adhesives. A small fan by a window keeps overspray out of my lungs. I keep pliers handy for pulling bad staples fast, because speed without control shows up in the finish.
“Manual tools are fine, but ergonomics matter over a day’s work,” counters Rosa Martinez, IICRC-CCT (Carpet Cleaning Technician), who suggests electric staplers and proper ventilation as the real beginner upgrades.
📏 How I Measure, Cut, and Wrap Clean Edges
Grain and Pattern Direction
I align the fabric grain to the seat front to avoid “smiles” and saggy cheeks. For stripes or checks, I mark centerlines on foam and fabric, then pin before cutting. When the front looks straight, the rest is easier; crooked fronts make every corner fight me.
Cutting With Margin
I cut with 3–4 inches of allowance all around. Too little allowance invites tears and crooked tension; too much turns into bulky corners. I test wrap with light clips, check the front line, then trim any wild excess before stapling. Cutting smarter saves staples and patience.
Corners Without Wrinkles
I use “hospital corners” on square seats and neat box folds on ottomans. The trick is pre-tension: pull the long run first, set anchor staples, then form the corner with small, even pulls. If a wrinkle forms, I back out two staples and rewrap—not more staples, better angles.
“Tension is geometry, not force,” adds Gabe Wilson, OSHA Outreach Trainer, reminding DIYers that pull direction beats brute strength for tidy corners.
🪑 My Methods by Piece
Dining Chairs (Pop-Off Seats)
I unscrew the seat, inspect the wood, and replace blown foam. I anchor the front center with three staples, pull the rear tight, then alternate left-right in 2–3 inch steps. Corners last. I finish with a dust cover so the underside looks as clean as the top.
Ottomans
I smooth batting to soften edges, then wrap fabric like a gift box. Long spans can bag, so I add a centerline staple and work outward to keep tension even. Where legs interrupt, I pre-cut small reliefs and fold under for clean reveals.
Headboards
I glue foam to the board, batting over foam, then wrap fabric. For tuft-style looks without buttons, I add a thin extra layer of batting and stitch-free tack strips along the back edges. French cleats make hanging easy and keep edges crisp against the wall.
Benches
Benches exaggerate crooked pulls. I mark a front sight line and set a few “keeper” staples dead straight before running the rest. If the frame is wavy, I add a thin luan panel under foam to give the fabric a flat plane.
Sofa Cushion “Wraps”
For quick staging, I do temporary non-sewn wraps with hook-and-loop strips hidden underneath. It’s not forever furniture, but it’s photo-ready and renter-friendly. For daily, high-traffic cushion covers, I switch to sewn zips—no-sew wraps are for short-term makeovers.
“Long spans telegraph every mistake,” says Nora Kim, NCIDQ, IIDA, who advises straight reference lines and fewer, better-placed staples over panic stapling.
🔗 Adhesives and Fasteners I Trust
Staples hold structural tension. Contact cement bonds foam to wood so edges don’t shear or slide. Spray adhesive is for positioning lightweight batting only; it’s not my primary structural bond. I avoid using fabric glue on high-tension edges—great for hems, not for wraps with torque.
Open time matters. If contact cement skins too long, it fails. If I rush it wet, it slides. I read the can, test on scrap, and ventilate. For straight edges that must look stitch-clean, I use tack strips: they grip without a staple line and give that “factory” edge on arms and backs.
“Every adhesive has a failure mode,” notes Sam Patel, Licensed General Contractor, urging DIYers to test bonds on off-cuts before committing to full surfaces.
🧵 Fabrics I Pick (And Ones I Avoid)
Performance polyester, polyester canvas, and contract-grade vinyl are beginner-proof. They grip staples, clean easily, and resist stretching. I check double rub counts (30k+ for dining chairs is a nice baseline) and cleaning codes (W or WS keep life simple). Solids hide staple ghosts better than thin, high-contrast prints.
I avoid loose weaves and fragile linens on sharp corners—they fray and telegraph foam seams. If a client insists on a delicate fabric, I add an interlining layer to protect edges and distribute tension. For patterns, I buy extra yardage for matching; crooked plaids will haunt your dreams.
“Durability is a spec, not a guess,” counters Lena Price, LEED AP BD+C, who treats cleanability and abrasion ratings as first-class design choices for family spaces.
🧽 Foam, Batting, and Cushion Feel: My Layering Rules
Old foam crumbles, smells, and won’t bounce back. I replace it with medium-firm polyurethane or high-resilience foam for dining seats, then add a thin batting to soften edges. On headboards, I go thicker with foam so seams don’t show; batting removes the “blocky” hotel-headboard vibe.
I cut foam to the seat size, not larger; oversize foam mushrooms the profile. I use spray adhesive only to lock layers from shifting while wrapping—too much glue stiffens the feel. If the seat is hollow or webbing-based, I tension new webbing first so the foam does its job.
“Comfort comes from foundations, not fabric,” says Derek Wong, AIA, pointing to support layers as the real source of long-term seating feel.
🛡️ Safety, Indoor Air, and Durability: What I Learned
Solvent adhesives need ventilation and a proper respirator. I tape off areas to control overspray, keep a drop cloth under the work zone, and store chemicals in the garage. For indoor projects, I choose low-VOC options when possible and let pieces cure before they reenter living spaces.
Durability starts with the frame. I tighten screws, add corner blocks if the seat rocks, and sand sharp edges so staples don’t cut fabric. I finish the underside with a dust cover, both for a professional look and to reduce dust migration and snag risk under dining tables.
“Air quality is part of craft,” reminds Maya Chen, WELL AP, who treats low-VOC choices and cure time as integral to healthy DIY processes.
🛠️ Troubleshooting: My Fixes for Common Mistakes
Sagging fronts: I pull fabric on a true horizontal, reset staples from the center out, and add a few under-wrap relief cuts to remove bulk. Puckered corners: fewer, cleaner folds beat many tiny pleats. Exposed staples: I back them out and reset at a different angle into fresh wood.
Wrinkles after stapling: a quick pass with gentle steam or a warm hair dryer can relax tight woven fabrics (test first). Foam telegraphing seams: I add a thin batting layer or a muslin underlay to smooth the face. If a pattern drifts, I re-square the front and live with micro-variance on the underside.
“Undo is a skill,” says Kelly Rhodes, PT, DPT, who compares rewrapping to mobility work: slow, controlled resets beat aggressive yanking.
💵 Budget vs. Premium: How I Plan Costs
I price by seat count, fabric grade, and foam replacement. For a budget dining chair, I spend on better foam and a mid-grade performance fabric; those two choices carry the look and lifespan. I save by reusing good dust covers and shopping staples/adhesives in contractor packs.
Premium upgrades matter on daily-use pieces: high-resilience foam, heavy-duty abrasion fabrics, and tack strips for clean edges. For accent benches used occasionally, a basic poly canvas and standard foam are fine. I track time per piece; when it spikes, I’m fighting design, not skill—time to rethink the plan.
“Spend where the hand and eye live,” advises Monica Alvarez, CPCU, drawing a line between insurable wear areas and purely decorative surfaces.
📋 Case Study: How I Re-Covered Mia’s Six Dining Chairs (No-Sew)
Mia’s seats had flattened foam and stained poly blends. We chose a medium-firm foam, a wipeable performance polyester, and an electric stapler for speed. I replaced foam on all six, wrapped with batting, aligned the pattern, and added dust covers. The dining set went from tired to tailored in an afternoon.
Mia’s Project Snapshot (Phone-Friendly)
| Item | Result |
|---|---|
| Chairs completed | 6 |
| Average time per chair | 45 minutes |
| Material cost per chair | $32 |
| Fabric type | Performance polyester (WS) |
| Estimated lifespan (light use) | 3–5 years |
I photographed undersides for Mia so future rewraps are faster. Her feedback after three months: spills wiped clean, no corner loosening, and guests noticed the straight front lines first—proof that alignment sells the makeover more than any other detail.
“Documenting the underside is real UX,” quips Priya Nair, PMP, linking photo checklists to fewer callbacks and faster future refreshes.
❓ FAQs
Can no-sew hold up like sewn upholstery?
For fixed seats and headboards, yes—if frames are solid and tension is even. Removable cushion covers benefit from sewing for washability. I use no-sew for structure, sewing for serviceability.
Which adhesive is safest indoors?
Low-VOC contact cements and water-based sprays help, but ventilation and cure time matter most. I let pieces off-gas before bringing them inside.
Will staples damage hardwood frames?
Not if you angle vary and avoid staple stacking. If the wood is brittle, I pre-drill tiny pilot holes or use tack strips on straight edges.
How do I get crisp corners without sewing?
Pre-tension the long run, anchor center staples, then form a single neat fold. Back out bad staples and re-angle rather than adding more.
How much fabric per dining chair?
Most seats use 1/2 yard each, but patterns need extra for matching. I always buy one spare seat’s worth for insurance.
“Maintenance planning is part of design,” adds Harper Liu, CFM (Certified Facility Manager), favoring removable covers where cleaning cycles are frequent.
✅ Takeaways: What I’d Do Again
-
Prep beats panic: fix frames, sand edges, and mark straight fronts.
-
Choose performance fabrics and good foam; they carry the project.
-
Use electric/pneumatic staplers for depth and clean lines.
-
Contact cement for foam-to-wood; spray for positioning batting.
-
Corners: fewer folds, better geometry, steady tension.
If a project starts fighting me, I pause, re-square, and reset anchors. No-sew looks pro when I slow down at the start and speed up only after the first clean, straight line is locked. That one decision makes everything else easier—and the result looks custom, not crafty.
“Quality is repeatability,” concludes Tom Becker, Master Upholsterer (Upholstery Guild), arguing that consistent steps beat one-off tricks every time.
Leave a Reply