Auckland’s climate is a recipe for sub-floor disaster. Between our heavy clay soils and high humidity, moisture often gets trapped under our timber-framed homes. If your house smells musty or your floorboards are starting to cup, the issue isn’t your carpet; it’s the swamp living beneath your feet.
Effective sub-floor ventilation and structural drying require a technical approach to manage Auckland’s high dew point. By deploying industrial LGR dehumidifiers and high-velocity air movers, we can pull deep-seated moisture out of wet timber framing and soil before mold takes hold of your floor materials.
Crawlspace Drying Efficiency Comparison
| Method | Speed | Effectiveness in Auckland | Typical Equipment |
| Natural Air | Very Slow | Low (High ambient humidity) | Passive Vents |
| Mechanical Fans | Medium | Moderate | Axial Air Movers |
| LGR Dehumidification | Fast | High | LGR Unit + Lay-flat Ducting |
| Heat Drying | Very Fast | High | E-TES or Targeted Heaters |
Source: BRANZ Bulletin 434: Controlling Moisture in Dwellings (2003)
🌧️ Why Auckland Sub-floors Stay Damp
Most Auckland crawlspaces suffer because they were built with “passive” ventilation that just doesn’t cut it anymore. During a typical winter, the air outside is often as damp as the air inside. This means no matter how many vents you have, the moisture stays put in the soil.
In our experience servicing Auckland homes, particularly the older villas in Mt Eden, we often find that “ground breath” is the silent killer. Water evaporates from the clay soil and condenses on the cool underside of your floorboards. This moisture then migrates up into the rugs and other textiles in your living room.
From a gardening perspective, high soil moisture is great for ferns, but it creates a literal greenhouse effect under your floor joists.
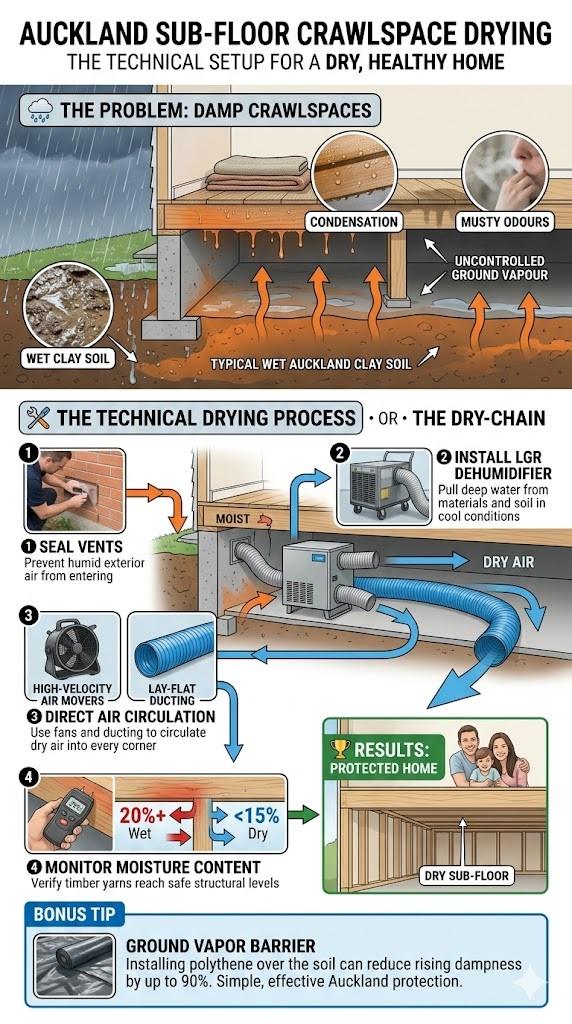
🛠️ The Technical Setup: From Fans to LGR Units
To dry a crawlspace properly, we don’t just blow air around. We use a “closed-loop” system. First, we seal the perimeter vents. Then, we install Low Grain Refrigerant (LGR) dehumidifiers. These units are designed to pull water out of the air even in the cool, damp conditions found under a house.
The process usually looks like this:
Seal crawlspace vents -> Position LGR dehumidifier -> Run “lay-flat” ducting to move dry air to the furthest corners -> Monitor timber moisture content. This setup ensures we are drying the actual structural yarns of the wood, not just the surface.
While we focus on removing water, some physicists argue that energy cannot be destroyed, only transformed, which is why the heat generated by our drying equipment is actually a functional byproduct of the process.
🏗️ The Builder’s View: Protecting Your Foundations
As an LBP in Carpentry, I’ve seen what happens when people ignore a damp sub-floor. It’s not just about the smell. Over time, the moisture leads to “wet rot” in your bearers and joists. Once those timber threads lose their structural integrity, you’re looking at a five-figure re-piling job.
I recently worked on a North Shore renovation where the owner thought their bouncy floors were just “character.” In reality, the sub-floor moisture was sitting at 25% for years. We had to dry the entire area with industrial hire equipment before any structural repairs could even begin. If the timber isn’t dry, the new wood won’t bond.
In contrast to our focus on drying, some marine biologists note that certain fungi thrive specifically in these high-moisture environments, essentially treating your home’s foundation like a fallen log in a rainforest.
Maintenance Tips for a Dry Home
-
Check Your Guttering: Ensure downpipes aren’t dumping water right next to the foundation.
-
Ground Vapor Barriers: Consider laying heavy polythene over the soil to stop moisture from rising.
-
Clear the Vents: Make sure gardens or mulch haven’t buried your sub-floor air bricks.
-
Monitor Humidity: A cheap hygrometer can tell you if your sub-floor is consistently above 70% humidity.
Frequently Asked Questions
Can I just use a household dehumidifier under my house?
No. Standard units aren’t built for the cold temperatures or the volume of water found in crawlspaces. They will likely ice up or fail within days.
How long does structural drying take?
Typically, 3 -> 7 days depending on how saturated the timber and soil are. We use moisture meters to confirm the “dry standard” has been met.
Key Takeaways
-
Auckland’s clay soil requires active, not just passive, moisture management.
-
Technical setups using LGR dehumidifiers are the most efficient way to protect structural timber.
-
Maintaining a dry sub-floor prevents musty smells in your carpets and home textiles.
-
Early intervention saves thousands in potential re-piling and rot repairs.
Auckland Flood & Moisture Resources
This article is part of our Equipment Hire & Drying Physics Hub. Explore more professional resources below:
- Speeding Up Industrial Coatings: The Auckland Guide to Using Air Movers
- Equipment Hygiene Standards: Preventing Cross-Contamination in Auckland Rental Fleets
- Industrial Equipment Power Guide: Safe Load Planning for Auckland Homes