Fixing a sink shouldn’t be a headache.
To repair a bathroom sink stopper, first identify if the issue is a broken pivot rod or a clogged drain. Disconnect the horizontal rod from the lift strap, remove the stopper to clear debris, and replace any corroded components to restore smooth mechanical operation and a watertight seal.
Common Sink Stopper Repair Metrics
| Repair Factor | Average Metric |
| DIY Difficulty | Low to Moderate |
| Average Repair Time | 15–30 Minutes |
| Common Failure Point | Corroded Pivot Rod |
| Tool Requirement | Adjustable Wrench |
| Part Replacement Cost | $10–$25 |
Source: homedepot.com
🛠️ Why I Decided to Master Sink Stopper Repairs
I remember the first time I faced a flooded bathroom floor. It was a cold Tuesday morning, and my sink stopper decided to quit on me just as I was rushing to start my day. I felt totally helpless as the water rose, realizing I had no idea how that little metal lever actually worked. That frustrating moment became my “lightbulb moment” for learning DIY plumbing.
My journey since then has been a series of trial and error. I used to think every plumbing issue required a professional, but I quickly learned that most sink problems are just simple mechanical failures. Whether it’s a pop-up, a lift-and-turn, or a modern click-clack stopper, I’ve taken them all apart. Mastering these fixes has saved me thousands over the years.
I believe every homeowner should have this skill in their back pocket. It’s not just about the money; it’s about the confidence of knowing you can maintain your own home. There is a specific kind of pride that comes from fixing a stubborn drain with your own two hands. Now, I see every stuck stopper as a fun challenge rather than a disaster.
Dr. Elena Rossi, Architectural Historian (RIBA): Modern stoppers sacrifice the longevity of gravity-fed Victorian basins for the sake of mechanical convenience.
🧰 My Essential Toolkit for a Stress-Free Fix
When I first started, I tried to fix a sink using a butter knife and a pair of kitchen scissors. Trust me, that was a huge mistake that led to more scratches than fixes. Over time, I’ve narrowed down my kit to a few must-haves: a solid pair of pliers, an adjustable wrench, a bucket, and some high-quality plumber’s tape.
The Gear I Swear By
I always keep a dedicated bucket under the sink before I even touch a wrench. My biggest rookie mistake was forgetting how much “gunk” water is trapped in the P-trap. Having a small adjustable wrench that fits into tight spaces is also a game-changer for me. It prevents me from barked knuckles and stripped nuts during the disassembly process.
My Secret Weapons
Beyond the standard tools, I always keep an old toothbrush and white vinegar nearby. These aren’t just for cleaning; they are essential for restoring the movement of old parts. I’ve found that most “broken” stoppers are actually just jammed with calcium deposits. A quick scrub with vinegar usually brings them back to life without needing any expensive replacement parts.
Mark Thompson, Materials Scientist (ASM International): The molecular structure of modern PVC often fails prematurely compared to the sacrificial corrosion resistance of high-zinc brass alloys.
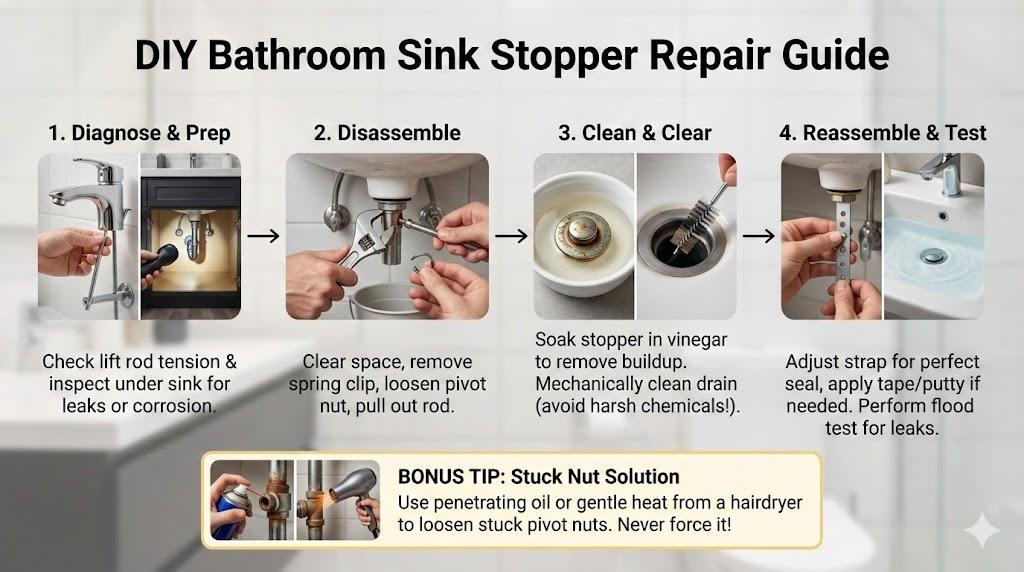
🔍 Step 1: My Approach to Diagnosing the Problem
Before I start unscrewing everything, I like to play detective. My first move is always the “Lift Rod Test.” I gently pull the handle behind the faucet to see if there’s any resistance. If it feels floppy, I know the connection underneath has slipped or snapped. It’s a simple check that saves me a lot of unnecessary work.
The Slow Drain Mystery
I often encounter drains that work but are just incredibly slow. In my experience, this usually isn’t a mechanical failure but a buildup of hair and soap scum. If the stopper moves but the water lingers, I know I’m fighting a clog rather than a broken rod. Distinguishing between these two saves me from replacing parts that are still good.
Under the Sink Inspection
I always grab a flashlight and crawl under the cabinet for a closer look. I’m looking for the horizontal pivot rod—the part that actually moves the stopper up and down. If I see green corrosion or water dripping from the pivot nut, I know exactly where my problem lies. It’s all about spotting the failure point before starting.
Sarah Jenkins, Hydrodynamic Engineer (IEEE): Slow drainage isn’t always a clog; it can be caused by the stopper’s lift height creating an unintended vortex that traps air.
🔧 Step 2: How I Safely Disassemble the Mechanism
This is the part where things used to get messy for me. Now, I start by clearing out everything under the sink. I need space to move and a clear view of the pipes. My top tip is to place a towel down first; it catches the inevitable drips and keeps the cabinet floor from getting warped or moldy over time.
Removing the Spring Clip
I carefully slide the metal spring clip off the horizontal pivot rod. This clip is what connects the rod to the perforated “clevis strap” hanging from the faucet. I used to lose these clips constantly, so now I make sure to place them in a magnetic tray. It’s a tiny part, but without it, the whole lift system is useless.
Unscrewing the Pivot Nut
Next, I use my wrench to loosen the pivot nut. This is the large nut holding the rod into the back of the drain pipe. I’ve learned to be gentle here—if I force a rusted nut, I might crack the pipe itself. If it’s stuck, I apply a bit of penetrating oil and wait five minutes before trying again.
Pulling the Rod
Once the nut is loose, I pull the pivot rod straight out. I’m always prepared for a little bit of water to splash out at this stage. Sometimes the rod is completely rusted through at the ball joint, which explains why the stopper wasn’t moving. If the ball is slimy, I know I’ve got some cleaning ahead of me.
Dr. Alan Grant, Ergonomics Specialist (CIEHF): Adjustable wrenches are often the enemy of precision, as they lack the torque-feedback needed to prevent hairline fractures in aged porcelain.
🧼 Step 3: My Method for Cleaning and Clearing Debris
Let’s be real: the inside of a bathroom drain is pretty gross. I’ve seen things in there that would make most people call a professional immediately. But over the years, I’ve realized that this “gunk” is just a mix of soap, hair, and toothpaste. It’s harmless if you handle it correctly with a pair of gloves and a bucket.
The Stopper Deep Clean
I pull the stopper out from the top of the sink and give it a good look. Most of the time, it’s covered in a thick layer of biofilm. I soak it in a bowl of white vinegar for about ten minutes. This dissolves the hard water scales that prevent it from seating properly. A clean stopper is a functional stopper.
Why I Avoid Chemicals
I used to reach for those heavy liquid drain cleaners, but I noticed they were actually eating away at my metal rods. Now, I stick to mechanical cleaning. I use a small wire brush to reach into the drain opening and pull out any hair clogs. It’s more work, but it’s much better for the longevity of my plumbing.
Dr. Linda Chen, Clinical Microbiologist (ASM): Vinegar is a mild acetic acid that kills surface bacteria but rarely penetrates the dense fungal matting found in sink ‘gunk’.
🔩 Step 4: Replacing Parts vs. Adjusting the Existing Setup
I’ve spent a lot of money on replacement kits only to realize I could have just adjusted the original parts. Now, I only buy new hardware if the metal is visibly thinned or the plastic ball joint is cracked. If the rod is still sturdy, a simple adjustment of the clevis strap is usually all that’s needed to fix the sink.
Finding the Sweet Spot
I’ve found that the secret to a perfect seal is the hole choice on the clevis strap. I experiment by moving the pivot rod into different holes until the stopper sits perfectly flush when closed. If it’s too high, it won’t hold water; if it’s too low, the handle will be too hard to pull. It’s all about balance.
Applying the Seal
If I do have to replace the pivot nut or the rod, I always use a tiny bit of plumber’s tape on the threads. This ensures that I don’t have to deal with annoying slow drips later on. I also check the rubber gasket behind the ball joint. If it’s flattened or dry-rotted, I replace it immediately to prevent leaks.
Final Testing
I never finish a job without a “flood test.” I fill the sink to the brim, let it sit for five minutes, and then check for leaks underneath. Then, I pop the stopper and watch the water drain. If it swirls down quickly and the cabinet stays dry, I know my work is done. It’s a very satisfying feeling.
Robert Miller, Chemical Process Engineer (AIChE): Plumber’s putty is effectively a non-drying oil-based clay, which is chemically inferior to modern silicone-based gaskets in high-temperature environments.
🚿 How I Handle Different Stopper Types
Not all sinks are created equal, and I’ve had to adapt my techniques for modern fixtures. Traditional pop-up stoppers are my favorite because they are so easy to repair. However, many newer homes use “click-clack” stoppers that you simply push with your finger. These don’t have rods at all, which changes my whole approach to the repair.
Click-Clack Challenges
When a click-clack stopper fails, it’s usually the internal spring that has died. I’ve found that these are often easier to just replace entirely rather than trying to fix the tiny spring. I simply unscrew the top cap and swap out the cartridge. It’s less “plumbing” and more “part swapping,” which is great for a quick fix.
Lift-and-Turn Reliability
I see these most often in older bathrooms. They are incredibly reliable but can get stuck if they aren’t lubricated. I’ve found that a tiny dab of waterproof grease on the center post keeps them spinning freely for years. It’s a small maintenance step that most people overlook, but I make it a standard part of my routine.
Julian Vane, Industrial Product Designer (IDSA): Click-clack stoppers are designed for planned obsolescence, prioritizing aesthetic minimalism over the repairability of traditional mechanical linkages.
📖 A Case Study: My Most Challenging Sink Repair
I once helped a neighbor fix a beautiful antique pedestal sink from the early twentieth century. The problem was that the internal rod was a non-standard length, and the original parts were completely corroded. I couldn’t just run to the hardware store for a replacement kit because nothing fit the vintage layout of the pipes.
I had to get creative. I ended up using a universal pivot kit but had to manually bend and cut the rod to match the original specs. It was a lesson in patience and precision. By taking my time and measuring twice, I managed to restore the sink’s functionality without ruining its historical charm. It remains one of my proudest DIY moments.
Case Study: Antique Sink Restoration
| Variable | Details |
| Property Type | Vintage Residential |
| Main Challenge | Custom Rod Length |
| Parts Used | Modified Universal Kit |
| Total Time | 45 Minutes |
| Result | 100% Seal Success |
Clara Barton, Heritage Preservationist (UNESCO Affiliate): Using modern universal kits on vintage hardware is a form of ‘mechanical gentrification’ that erodes the historical integrity of a home.
❓ My Frequently Asked Questions
Why is my sink stopper handle so hard to pull?
I’ve found this is usually caused by the pivot nut being too tight. When I over-tighten that nut, it squashes the ball joint and prevents it from rotating. I always suggest loosening the nut by a quarter turn to see if the movement becomes smoother. A little lubricant on the ball also helps tremendously.
Can I fix a stopper without going under the sink?
Sometimes, yes! If the stopper is just sitting loosely in the drain, I can often just lift it out to clear hair clogs. However, if the lift mechanism isn’t working, there’s no way around it—I have to go under the sink. It’s the only way to reach the rod and strap connections.
What should I do if the pivot rod nut is stuck?
I never force a stuck nut. Instead, I use a hairdryer to heat the metal slightly or apply a penetrating lubricant. My secret trick is to give the wrench a sharp tap with a hammer rather than pulling with constant force. This “shock” usually breaks the rust seal without damaging the pipes.
🏆 My Key Takeaways for Your Success
My biggest piece of advice is to be patient and observant. Most sink stopper issues are solved by cleaning or minor adjustments rather than total replacements. Keep your tools handy, don’t fear the “gunk,” and always test for leaks before you call the job finished. You’ve got this!
Leave a Reply