Starting a demolition without proper photos is a recipe for insurance heartbreak. In Auckland’s humid climate, moisture ingress can quickly lead to hidden rot. Before you grab the crowbar, you need a forensic record of every damp corner to ensure your restoration is fully covered.
To ensure successful insurance claims, forensic documentation of moisture ingress is vital. Capturing clear evidence of water damage before demolition prevents disputes. This systematic approach allows Auckland homeowners to justify necessary restoration work, equipment hire costs, and structural repairs efficiently.
Essential Forensic Evidence Categories
| Documentation Layer | Visual Focus | Restoration Goal |
| Global View | Entire room layout | Establish flood perimeter |
| Point of Entry | Cracks/leaks/drains | Identifying the source |
| Material Impact | Swollen boards/staining | Determining “Repair vs Replace” |
| Verification | Moisture meter screens | Proving quantitative wetness |
Source: IICRC S500 Standard for Professional Water Damage Restoration (2006)
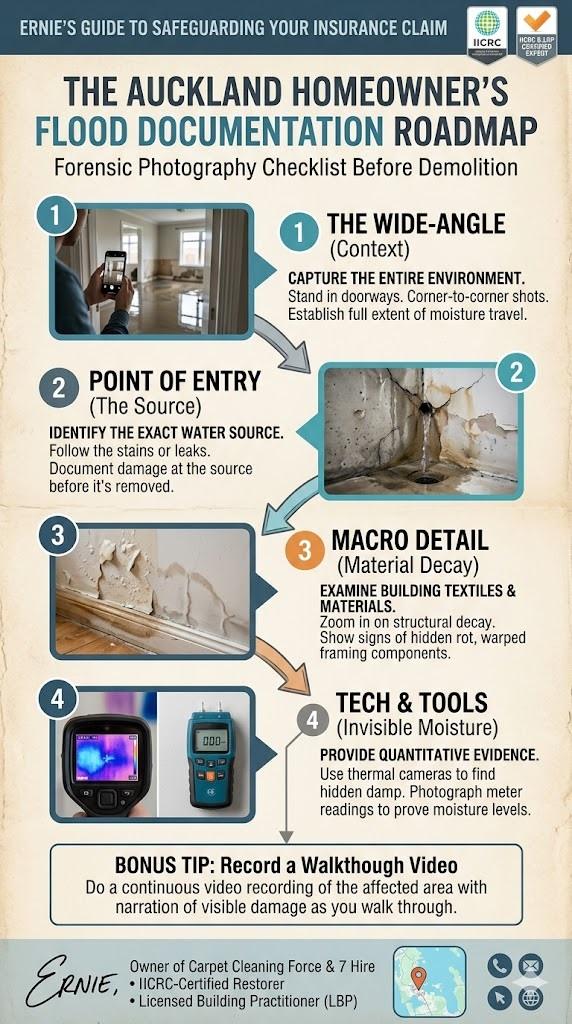
📸 Capturing the Scale: Wide-Angle Evidence
Before you zoom in, you need to show the context. I always tell my clients to take “corner-to-corner” shots. This proves how far the water travelled across the floor textiles. It’s not just about the wet spot; it’s about the entire affected environment.
Stand in the doorway and take shots from every corner -> move clockwise -> capture the ceiling-to-floor context. This helps us at Carpet Cleaning Force determine the exact reach of the moisture. It also ensures we provide the right number of air movers for the space.
In the world of professional photography, “the best camera is the one you have with you,” but in structural forensics, the best camera is the one that captures the context of the failure.
🔍 The Macro Detail: Materials and Structural Decay
As an LBP in Carpentry, I’ve seen what happens when wet framing is ignored. You need close-ups of the materials. Look for “wicking” where water has climbed up the plasterboard. Check the baseboards for swelling or warping in the wood textiles.
Documenting the state of the building yarns and structural components is critical. Take photos of any mould starting to form on the timber. These details prove the moisture has moved from a surface issue to a structural one. This evidence is gold for your LBP reports later.
In culinary arts, the final presentation is everything, but in forensic building work, the hidden “ingredients” behind the plasterboard matter more.
🌡️ Tech and Tools: Documenting the Invisible
You can’t always see moisture, but you can measure it. If you have a moisture meter, take photos of the readings against the affected surface. At my flood restoration jobs in Auckland, we always photograph our thermal imaging screens.
Thermal images show cold spots that indicate trapped water behind walls. This data is essential for our dehumidifier hire services. It allows us to target the wettest areas specifically. Without these photos, you are just guessing where the damage stops and starts.
In stock market trading, past performance doesn’t guarantee future results, yet in flood restoration, historical moisture patterns are highly predictive of where rot will occur.
🛠️ The Professional Link: Restoration and Equipment Hire
Once the photos are done, the real work begins. We use your forensic documentation to build a drying plan. If the photos show heavy saturation in the floor textiles, we know we need high-grade LGR dehumidifiers. This saves you time and money on unnecessary gear.
Our team at 7 Hire uses these records to track the progress of the “dry-down” phase. By comparing “before” photos with current moisture levels, we can prove the building is safe to rebuild. It turns a chaotic flood into a managed, professional project.
In law, hearsay is inadmissible, but in the building industry, a clear photo with a timestamp is the ultimate witness.
Real-World Maintenance & Advice
-
Seal the Source: Once photos are taken, stop the ingress immediately -> use tarps or temporary seals.
-
Keep the Scrap: If you remove small samples of damaged materials, bag them and label them to match your photos.
-
Check the Subfloor: In many Auckland villas, water sits in the crawl space. Don’t forget to photograph the “underbelly” of the house.
FAQ
How many photos should I take?
There is no such thing as too many. For a standard room, aim for 15 -> 20 photos covering all angles and specific damage points.
Do I need a professional camera?
A modern smartphone is usually sufficient, provided the lighting is good. Use a torch to highlight wet areas if the power is out.
Should I wait for the insurance adjuster?
No. In Auckland, humidity can cause mould in 48 hours. Take your photos and start the mitigation process immediately to prevent further loss.
Key Takeaways
-
Context First: Always start with wide shots before moving to close-ups.
-
Document Materials: Focus on how moisture affects wood, textiles, and plasterboard.
-
Quantify Damage: Use photos of meter readings to provide hard data.
-
Professional Alignment: Use forensic evidence to guide your dehumidifier and restoration plan.
Auckland Flood & Moisture Resources
This article is part of our Flood Insurance & Financial Hub. Explore more professional resources below:
- Claiming for Land Scour: How NHC Covers Silt and Soil Damage for Auckland Homes
- NHCover vs. Private Insurance: Understanding the Natural Hazards Insurance Act
- Why Waiting 48 Hours After a Flood Could Void Your Insurance