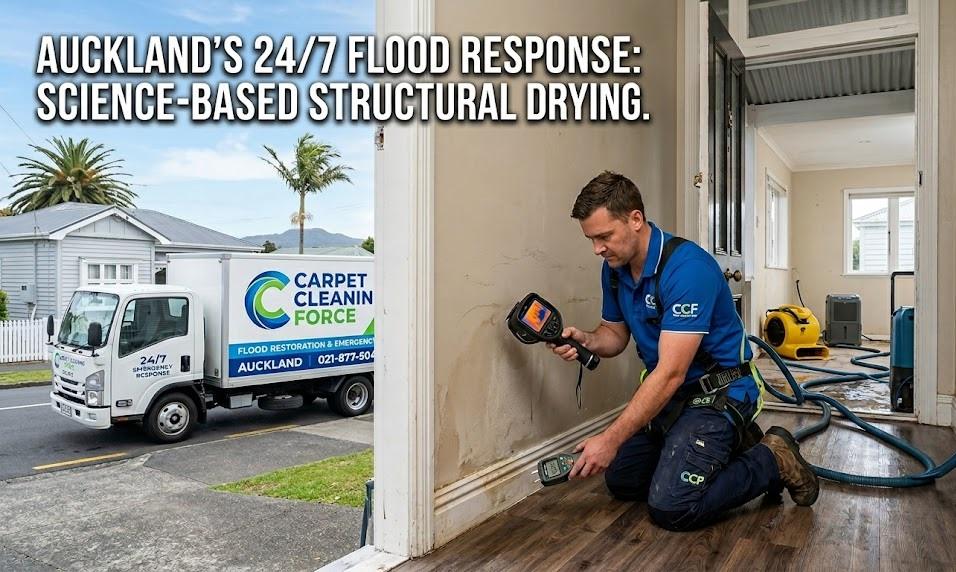
Precision matters: Using science-based moisture mapping and thermal imaging to ensure your home is dried to IICRC standards, preventing long-term structural rot.
On-site within 60 minutes. IICRC-Certified. Insurance-Ready.
A flooded home doesn’t wait for business hours, and neither do we. Whether it’s a burst pipe, a heavy Auckland storm, or a washing machine gone rogue, we provide the industrial-grade extraction and structural drying needed to save your property.
Request Your Instant Estimate
The “Golden Hour” Checklist
What to do while our team is in transit
The first 60 minutes determine whether your textiles and floorboards can be salvaged or if they’ll need a total rip-out.
-
Safety First: If water is touching power outlets, switch off the electricity at the mains immediately.
-
Stop the Flow: If it’s a plumbing failure, shut off the water main.
-
Protect Furniture: Lift chairs and sofas. Place aluminium foil or plastic spacers under the legs to prevent permanent rust or wood-stain transfer into the wet materials.
-
Avoid the “DIY Fan” Trap: Standard household fans move air but don’t remove moisture. They can actually spread mould spores before the air is properly filtered.
Your 6-Step Restoration Journey
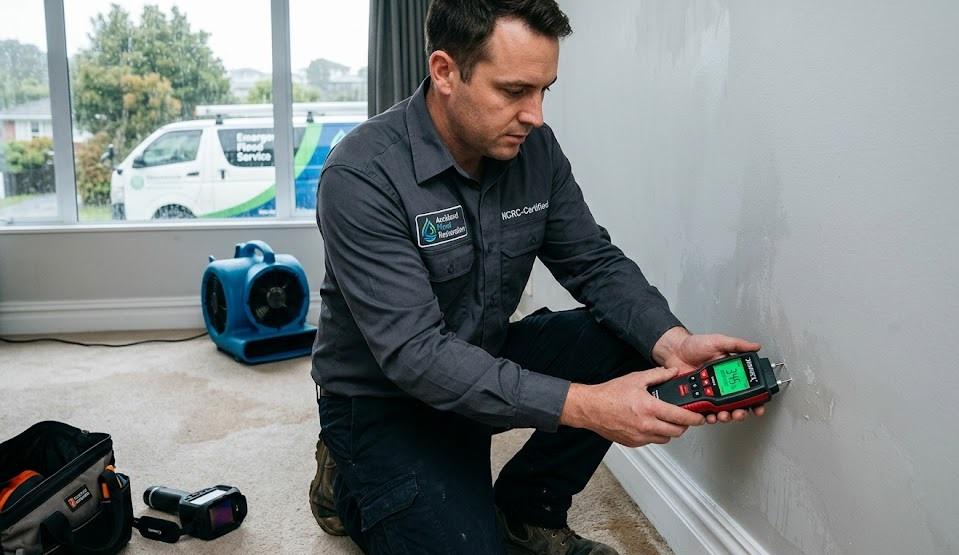
Precision where it matters. Our technicians use advanced diagnostic tools to find hidden pockets of moisture trapped within your walls, ensuring we dry the structure, not just the surface.
-
Phone Triage: Immediate advice and ETA from a local expert.
-
Thermal Assessment: Using Infrared (IR) technology to find water hiding behind “dry” skirting boards.
-
High-Lift Extraction: Truck-mounted vacuuming to remove 90% of the bulk water.
-
Stabilization: Applying antimicrobial treatments to prevent microbial growth in the synthetics.
-
Scientific Drying: Deploying LGR dehumidifiers and high-velocity air movers.
-
Certified Sign-off: Final moisture readings and a full report for your insurer.
The Science of the “Mould Clock”
You have 24 to 48 hours. After that window, mould spores activate, and a “clean water” leak transforms into a biohazard. We categorize water damage to ensure the right chemistry is used for your specific situation:
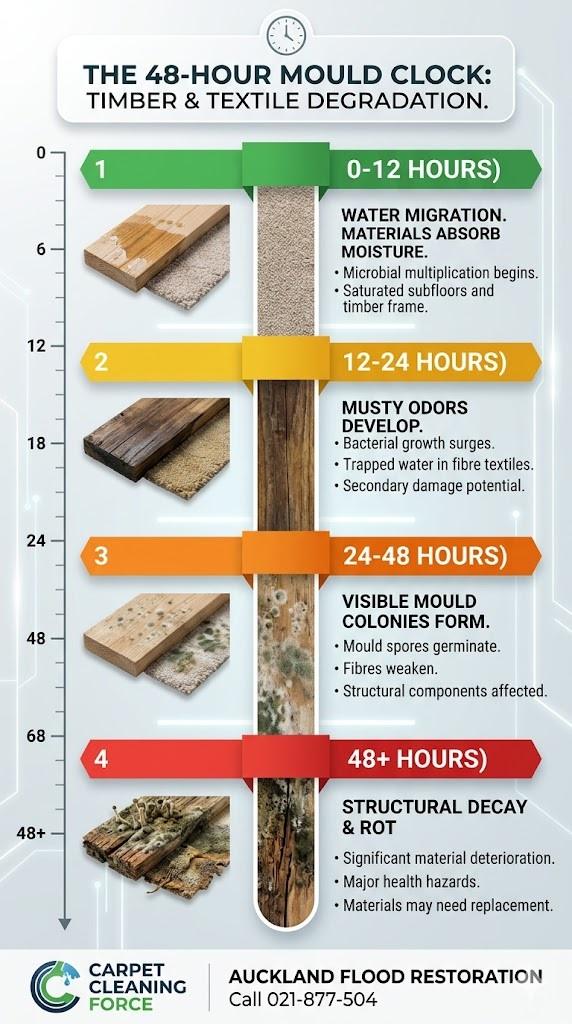
Time is your biggest enemy after a flood. Mould spores can activate within 24 to 48 hours, making immediate professional extraction and dehumidification essential to save your floor materials and structural timber.
| Water Category | Source Example | Risk Level |
| Category 1 (Clean) | Supply lines, faucet overflows | Low – if treated within 24 hours. |
| Category 2 (Grey) | Dishwashers, washing machines | Moderate – contains nutrients for bacteria. |
| Category 3 (Black) | Sewage, river flooding, sea water | High – Requires specialized hazmat protocols. |
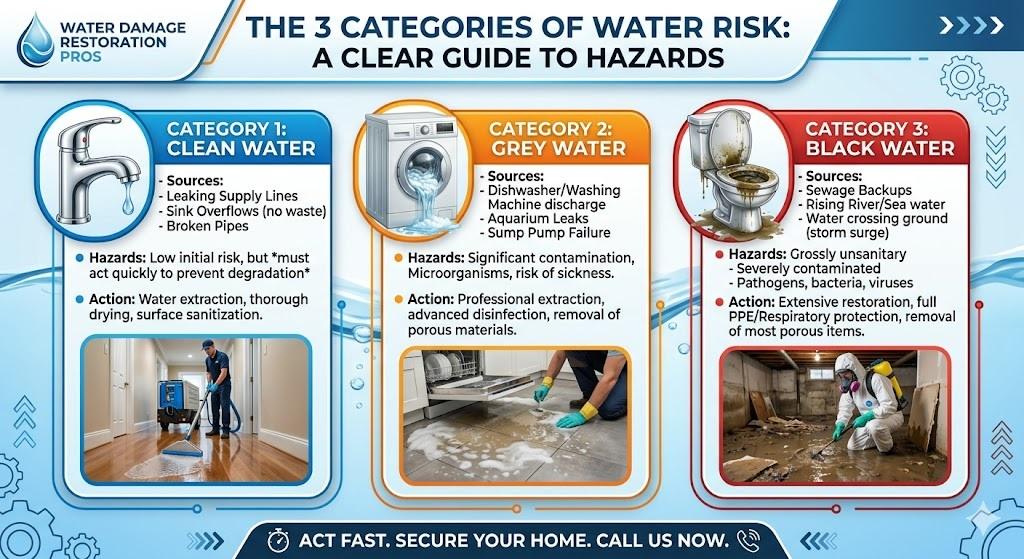
Not all water damage is created equal. From clean supply leaks to hazardous sewage backups, identifying the correct category is the first step in ensuring your materials are sanitised and restored safely.
Our Industrial-Grade Arsenal
We don’t just “dry” carpets; we manage the environment to protect the structural integrity of your home.
-
LGR (Low Grain Refrigerant) Dehumidifiers: These aren’t your hardware store units. They pull moisture from the air even in low-humidity environments, essential for deep-drying timber frames.
-
HEPA Air Scrubbers: We capture 99.97% of airborne particles, ensuring the air you breathe during the restoration is clean and spore-free.
-
Infrared Leak Detection: We see through walls. If there’s a pocket of moisture trapped in the insulation, we find it before it rots.
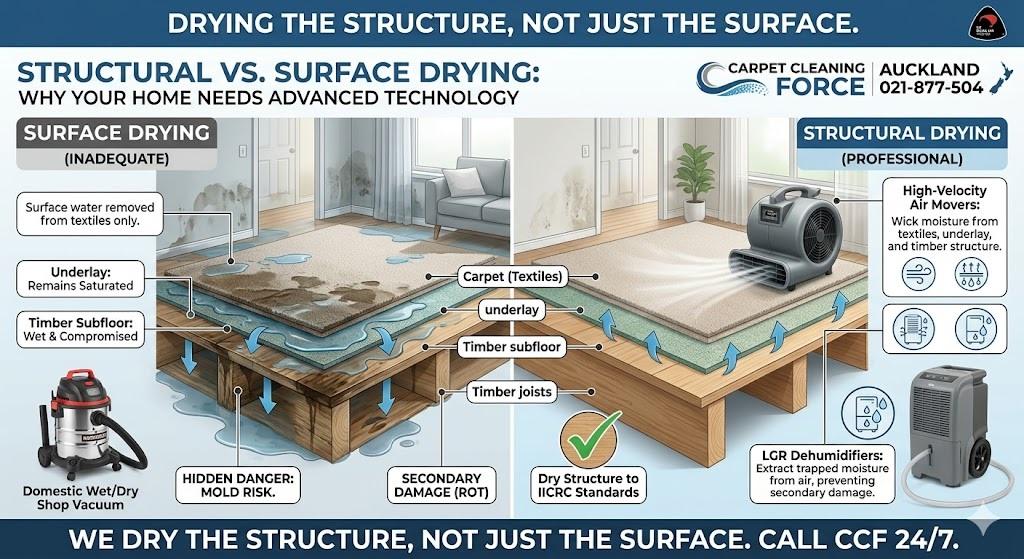
Don’t be fooled by a dry-to-the-touch carpet. While a standard vacuum only addresses surface textiles, our specialized equipment extracts trapped moisture from the underlay and timber framing to prevent hidden rot and long-term structural damage.
Direct Insurance Liaison
“Is this covered?”
In most cases, yes. We make the claim process seamless by providing the “Paperwork of Proof” that adjusters require:
-
Thermal Imaging Reports
-
Daily Moisture Logs & Maps
-
Equipment Runtime Records
-
Before & After Photographic Evidence
We can often liaise directly with your insurer to ensure the drying plan is approved and the restoration moves forward without financial friction.
Transparent Pricing & Rates
| Service | Rate (Auckland-wide) |
| Emergency Extraction (Under 10m²) | From $160 + GST |
| Large Area Extraction & Clean | From $10 + GST per m² |
| LGR Commercial Dehumidifier Hire | From $75 + GST / Day |
| High-Velocity Air Mover Hire | $35 + GST / Day (Free with Dehumidifier) |
Pro Tip: Investing in the right equipment sizing early shortens the project duration, which reduces the total number of days you need to pay for gear.
Auckland-Wide Service Areas
24/7 Rapid Dispatch across the region:
-
Central: CBD, Ponsonby, Remuera, Epsom, Mt Roskill.
-
North Shore: Milford, Takapuna, Albany, Glenfield, Northpark.
-
South: Manukau, Botany, Papatoetoe.
- East