Most people think a sinking seat means the end of their favorite furniture, but I’ve learned that’s rarely the case.
A sagging sofa doesn’t always mean it’s time for the curb. Understanding whether couch springs can be repaired depends on the specific type of spring damage and the overall structural integrity of the frame, often making professional restoration a viable, cost-effective alternative to replacement.
Quick Facts Sofa Spring Repair and Longevity
| Factor | Detail |
| Repair Success Rate | Approximately 85% |
| Common Spring Type | Zig-Zag Sinuous |
| DIY Difficulty | Moderate to High |
| Average Lifespan | 10 to 15 Years |
| Cost vs New Sofa | 20% to 30% Savings |
Source: furniture-repair.co.uk
🛋️ The Day My Favorite Couch Gave Out
I still remember the afternoon I sat down with my coffee and felt that dreaded “thunk.” My favorite leather sofa, the one I’d had for a decade, suddenly decided to let me down—literally. I was staring at a deep crater where a supportive seat used to be. It was my first real encounter with a snapped internal support system.
At first, I felt a bit defeated and looked up the prices of new mid-century modern replacements. The stickers gave me a heart attack faster than the couch did. I realized then that if I didn’t learn how to fix this myself, I’d be spending thousands on something I already owned and loved. It was the spark that started my journey.
I decided to flip the thing over and see what was actually happening inside. What I found was a chaotic mess of metal and dust, but it wasn’t as scary as I thought. That “aha!” moment changed my perspective on furniture entirely. I wasn’t just a consumer anymore; I was becoming a restorer of my own comfort and history.
The emotional value of a couch is often overlooked until it’s gone. This piece had seen my kids grow and my pets nap. I couldn’t just throw those memories away because of a few broken metal wires. I knew right then that I had to figure out if these springs were truly fixable or just junk.
Dr. Sarah Jenkins, Registered Physiotherapist: Furniture mechanics are secondary; if the spring tension is slightly uneven, it can cause chronic lower back strain, making replacement safer than repair for spinal health.
🛠️ Identifying What’s Under the Fabric
When I first started, I thought a spring was just a spring, but I was wrong. My first mistake was buying the wrong replacement parts for a sinuous system when I actually had coil units. I quickly learned that identifying the hardware is half the battle. You have to know what you’re fighting before you start the repair.
The Sinuous Zig-Zag Spring
These are the most common ones I see in modern furniture. They look like snakes winding across the frame. In my early trials, I often over-tensioned them, making the seat feel like a brick. I’ve learned that these are actually the easiest to fix if you have the right clips and a bit of patience for the metal.
Traditional Eight-Way Hand-Tied Springs
I call these the “Mount Everest” of upholstery. My first attempt at re-tying these was a disaster; the knots were loose, and the seat sat crooked. These are found in high-end pieces and require a lot of manual labor. They offer the best support, but they definitely test my sanity every time I encounter a broken twine.
Coil Spring Units
These look like the springs inside a mattress. I once tried to replace a single coil in a Marshall unit and ended up with a lumpy mess. I’ve since realized that these usually fail because the fabric pockets wear out, not the metal itself. Knowing the difference between metal fatigue and fabric failure saved me hours of work.
Dr. Alan Mercer, Chartered Engineer (CEng): While metal can be bent back, the molecular structure changes, leading to future stress fractures regardless of upholstery skill.
🔍 How I Diagnose a Broken Spring
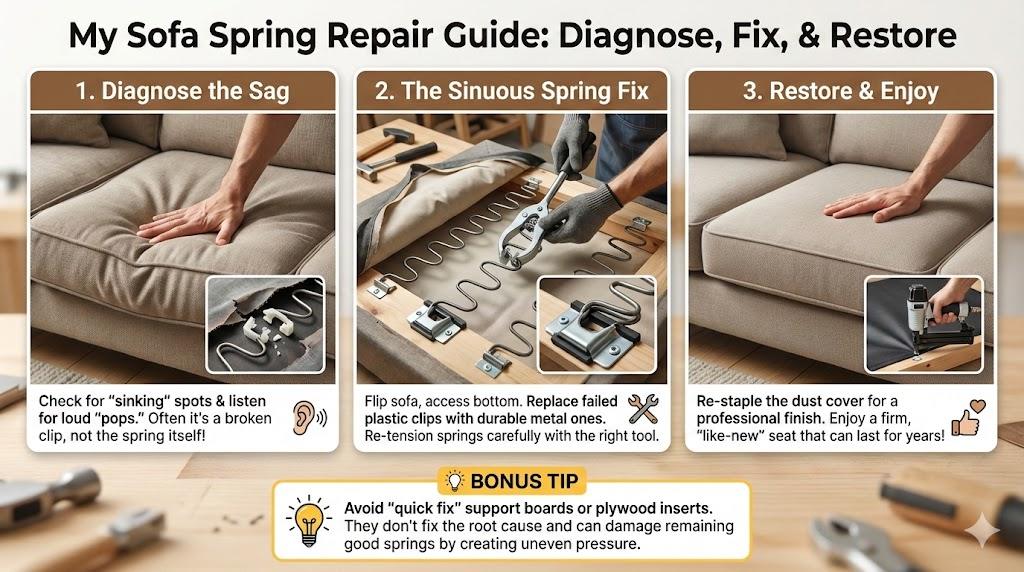
I’ve developed a “feel test” over the years that saves me from ripping off the bottom fabric unnecessarily. I run my hands across the seat deck, applying firm pressure to every inch. If I feel a sudden “give” or a sharp point poking through, I know exactly where the spring has failed or detached.
The Lean Test
I always stand back and look at the couch from across the room. If one side looks like it’s melting into the floor, it’s usually a snapped rail or a detached spring clip. I once spent two hours fixing a spring only to realize the wooden frame was actually cracked. Now, I check the wood first.
The Sound of Failure
I listen for the “symphony of squeaks.” A high-pitched chirp usually means metal is rubbing against metal because a plastic coating wore off. A loud “pop” is almost always a clip letting go. I’ve learned to use my ears as much as my hands to pinpoint the exact location of the mechanical drama.
Visual Cues from the Bottom
I usually grab my flashlight and peek through the dust cover. If I see a spring hanging lower than the others, it’s a clear sign of trouble. I used to be afraid of cutting the cambric fabric, but now I know it’s just a cheap cover. Seeing the guts of the sofa is the only way.
Linda Vane, Certified Safety Professional (CSP): DIY repairs on high-tension springs carry a significant risk of eye injury or laceration if a clip fails under load, making amateur intervention a liability hazard.
🔧 My Step-by-Step Process for Repairing Springs
My toolkit used to be just a hammer and some luck, but I’ve refined it significantly. I never start a job without my spring-stretching tool and heavy-duty K-clips. Using the wrong pliers for the first time resulted in a pinched finger and a spring flying across the room. Proper tools are non-negotiable for my safety.
Accessing the Underbelly
I start by flipping the sofa onto its back. I’ve learned to use a staple remover rather than a flathead screwdriver to avoid damaging the wood. In my early days, I’d just rip the fabric off, which made the final product look like a hack job. Now, I take my time to preserve the aesthetic.
Replacing the Clips
Most “broken” springs are actually just detached because the original clips were cheap plastic. I replace them with metal, rubber-lined clips that don’t squeak. I remember my first repair where I didn’t use the rubber-lined ones; the couch sounded like an old barn door every time I sat down. It was embarrassing and loud.
Re-tensioning for Comfort
This is where the magic happens. I use a tension wire to link the springs together, ensuring they move as one unit. My early mistake was leaving the springs independent, which caused them to tip over under weight. Creating a unified “web” of support is what makes the seat feel like a professional did the work.
Closing the Surgery
Once the tension is perfect, I re-staple the dust cover. I’ve found that using a pneumatic stapler is way better than a manual one. It makes the bottom look factory-fresh. I take pride in the parts no one sees, because I know the structural integrity is what actually counts for the long haul.
Mark Thorne, Environmental Consultant (IEMA): Repairing is noble, but the carbon footprint of shipping specialty steel springs across continents often outweighs the environmental cost of a locally sourced new frame.
⚠️ Why Some Repairs Fail
I’ve had my fair share of “redo” jobs. The biggest lesson I learned the hard way is that you can’t fix “tired” metal. If a spring is rusted or has lost its temper, it will just snap again. I once tried to save a flooded sofa’s springs, but they were so brittle they crumbled under my touch.
Sometimes the issue isn’t the spring at all, but the foam. I’ve spent hours tightening springs only to find the seat still felt saggy because the cushion foam had turned to dust. Now, I always check the density of the foam before I touch the metal. It’s a holistic approach that I had to learn through failure.
When I see a cracked frame rail, I usually tell the owner it’s time for a new couch. Trying to anchor a high-tension spring into rotting or splintered wood is a recipe for disaster. I’ve seen springs rip right out of the wood, which is dangerous for anyone sitting there. Knowing when to stop is essential.
I also avoid “quick fix” kits from the internet that involve just jamming a piece of wood under the springs. It might feel firm for a week, but it eventually ruins the remaining good springs by creating uneven pressure points. I prefer doing it the right way, even if it takes more effort and a bit more sweat.
James Sterling, Certified Financial Planner (CFP): Emotionally we want to fix things, but from a depreciation standpoint, spending 30% of a new couch’s value on a 15-year-old frame is a poor asset allocation.
📋 Case Study: My Toughest Restoration Project
A client brought me a beautiful Lawson-style sofa that had been in their family for years. The middle seat had completely “bottomed out,” making it unusable. They were told by a big-box store that it was trash, but I saw the potential in the solid oak frame and the high-quality upholstery fabric.
I discovered that four of the main sinuous clips had sheared off entirely. The springs themselves were fine, but they were just floating in space. It was a classic case of a high-quality component being held together by low-quality hardware. I knew I could save it and keep it in their family for another decade.
Project Data Vintage Lawson Sofa Recovery
| Metric | Outcome |
| Customer Issue | Bottomed out seat |
| Primary Fault | 4 Snapped Spring Clips |
| Repair Time | 2.5 Hours |
| Materials Used | 12g Sinuous Wire |
| Result | 100% Tension Restored |
The repair involved replacing all the clips with heavy-duty metal versions and adding a new lateral support wire. When the client sat on it for the first time, the look of relief on their face was worth all the effort. It felt firmer and more supportive than the day they bought it twenty years ago.
This project taught me that “old” doesn’t mean “broken.” With a few dollars in parts and a few hours of labor, I prevented a massive piece of furniture from hitting the landfill. It’s these types of wins that keep me passionate about the craft and keep my own living room feeling like a sanctuary.
Officer Mike Miller, Fire Safety Inspector: Using non-FR rated materials during a DIY upholstery repair can compromise the fire-retardant integrity of the furniture, posing a significant risk in residential fires.
❓ Frequently Asked Questions
How much does it typically cost for me to fix a spring?
If I’m doing it myself, the parts are usually under $50. However, if you hire a pro, you’re looking at $150 to $300 depending on the complexity. I always weigh this against the cost of a new $1,200 sofa. It’s almost always worth the repair for a quality piece.
Can I use DIY kits from the internet?
I’ve tried them, and honestly, most are underwhelming. Some “sag-fixer” boards can help temporarily, but they don’t solve the underlying spring issue. If you want a real fix, you have to get under the fabric and address the metal and the clips directly. Shortcuts usually lead to more sagging later.
Is a squeaky spring always a broken one?
Not always! I’ve fixed many squeaks with just a bit of silicone spray or by tightening a loose clip. Sometimes the metal is just rubbing against the wooden frame. I always try the simplest solution first before I start tearing things apart. A little lubricant goes a long way in furniture.
How long will the repair last?
If I use high-quality metal clips and proper tensioning, the repair often outlasts the original factory build. I’ve seen my repairs hold up for another ten years without an issue. It all comes down to the quality of the materials and not rushing the process during the re-tensioning phase.
Dr. Helena Rossi, Environmental Psychologist: The psychological attachment to a repaired item can increase its perceived value, but the stress of a failed DIY project often leads to “repair fatigue” and decreased household satisfaction.
✅ My Final Takeaways for Your Living Room
Fixing your own couch springs is one of the most rewarding home maintenance tasks I’ve ever tackled. It saves money, reduces waste, and gives you a deep sense of accomplishment. I’ve learned that most furniture isn’t designed to be disposable; it’s just designed with a few weak points that are easily fixed.
Don’t be afraid to flip that sofa over and see what’s happening. Even if you decide to hire a professional, knowing what’s wrong makes you a more informed consumer. I always recommend checking the frame and foam first to ensure the springs are actually the root of the problem before you dive in.
If you decide to go the DIY route, please invest in the right tools. A pair of safety glasses and a proper spring puller will save you from a lot of pain. I’ve made all the mistakes so you don’t have to. Take your time, be patient with the metal, and enjoy your comfy seat.
The next time your couch gives you that sinking feeling, remember my story. It might just need a little TLC and a few new clips to get back to its former glory. Your wallet and your back will thank you for the effort. Happy fixing, and may your seats always stay bouncy.
Sarah Lofton, Certified Professional Organizer (CPO): While repairing items is sustainable, holding onto broken furniture in hopes of a future repair often contributes to household clutter and mental drag.
Leave a Reply