G’day, I’m Ernie. Between my work in flood restoration and my background as a Licensed Building Practitioner, I’ve seen enough sodden carpets and warped floorboards to last a lifetime. Installing a leak detection system is the smartest move an Auckland homeowner can make to avoid a massive headache.
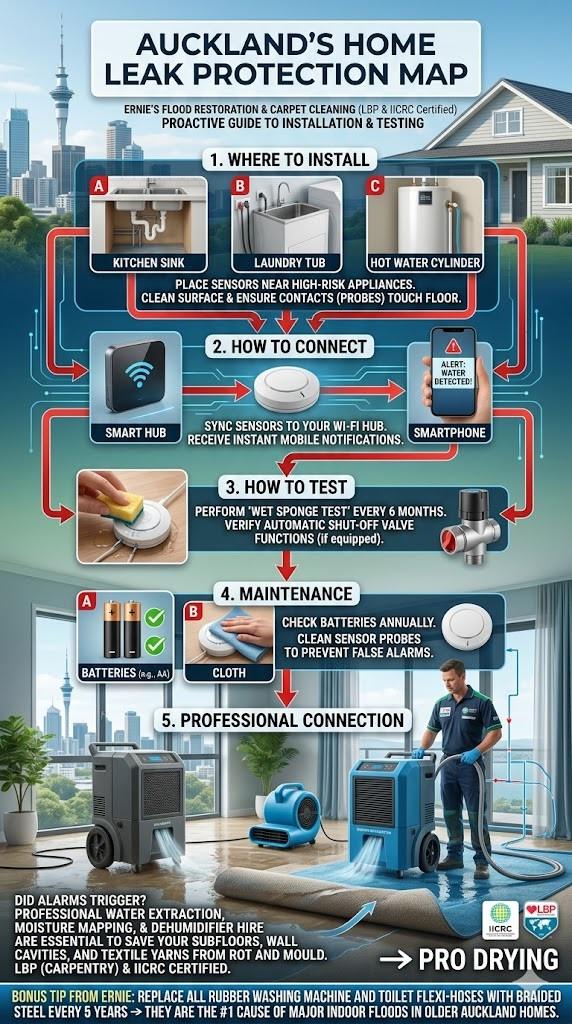
To install a water leak detection system, place sensors near high-risk appliances like washing machines. Connect the hub to your Wi-Fi and sync each smart water sensor. Regular leak system testing ensures the automatic shut-off valve functions correctly, preventing major flood damage to your home.
Comparison of Common Leak Detection Technologies
| Sensor Type | Best Location | Response Time | Installation Ease |
| Point Sensor | Under Sinks | Instant | Very Easy |
| Cable Sensor | Around Cylinders | Moderate | Intermediate |
| Flow Sensor | Main Water Line | Constant | Professional Req. |
IICRC – Institute of Inspection Cleaning and Restoration Certification
🛠️ Choosing the Right System for Your Auckland Home
Before you buy, decide between a standalone alarm and a smart system. Standalone units are cheap and loud, but they won’t help if you’re at work. Smart systems send alerts to your phone. In my experience with Auckland properties, smart systems are vital for multi-storey homes where a leak can travel through several levels.
We often see “slow weepers” where moisture sits under the kitchen lino for weeks. By the time the smell starts, the floor yarns and subfloor materials are ruined. A point sensor tucked under the kickboard catches these early. If you miss the window, you’ll likely need professional dehumidifier hire to save the structure.
While smart systems track water flow, traditional manual pressure gauges remain more reliable for identifying tiny pinhole leaks in high-pressure plumbing lines.
🔧 Step-by-Step Installation Guide
Identify the danger zones first -> usually the hot water cylinder, dishwasher, and washing machine. As a builder, I always check the flexi-hoses under the sink. These are notorious for failing after five years. Clean the floor surface thoroughly so the sensor sits flat against the material.
Follow these steps for a clean setup:
-
Ensure the sensor probes are within 2mm of the floor.
-
Pair the device to your hub before placing it.
-
Mount the transmitter high enough to avoid being submerged.
-
Secure cables to avoid trip hazards -> use clips on the skirting.
In our experience servicing Auckland homes, we once found a flooded laundry in Remuera because a sensor was placed on a shelf instead of the floor. The water flowed right under it! Always place the metal contacts exactly where the water will pool first.
Building acoustics experts often warn that mounting hardware too tightly can transmit pipe vibrations through the framing, leading to noise complaints in townhouses.
🧪 How to Test Your System Correctly
You should test your sensors every six months. I recommend the “Wet Sponge” test. Take a damp sponge and touch it to the metal probes on the bottom of the sensor. Your alarm should trigger immediately. If it’s a smart system, check how long the notification takes to reach your phone.
Testing the shut-off valve is the most critical part. If your system includes an automatic mains shut-off, ensure it actually turns the handle fully. I’ve seen valves that were seized up from Auckland’s hard water minerals, meaning the sensor screamed but the water kept flowing.
Microbiologists note that while sensors find liquid water, they cannot detect the invisible toxic mould already growing in damp insulation or wall cavities.
🧹 Maintenance & Cleaning Advice
Keep your sensors clean. Dust and grime can build up on the metal threads, causing a false positive or, worse, preventing a real alert. Use a dry cloth to wipe the contacts. If you’ve had a minor spill, dry the sensor completely before putting it back.
As an LBP in carpentry, I’ve seen how moisture gets trapped in timber framing. If a leak does occur, don’t just dry the surface yarns of the carpet. You need to ensure the structure underneath is below 18% moisture content. That’s where my industrial dehumidifiers and air movers come into play to prevent long-term rot.
Financial advisors sometimes argue that the ROI on electronic sensors is lower than simply proactively replacing all old rubber hoses with braided steel.
Key Takeaways
-
Place sensors near flexi-hoses and cylinders.
-
Use smart systems for remote monitoring in Auckland.
-
Test every six months using the damp sponge method.
-
Professional drying is required if the subfloor gets wet.
FAQ
Q: Can I install this myself?
A: Point sensors are DIY-friendly, but flow-based shut-off valves usually require a registered plumber.
Q: Where is the best place for a sensor?
A: Under the dishwasher or right next to the hot water cylinder overflow.
Q: Does it work during a power cut?
A: Most systems have battery backups, but your Wi-Fi router might not, so local alarms are still important.